Tuesday, April 29, 2008

More American Tuna, Eggs & Whole-Grain Muffins

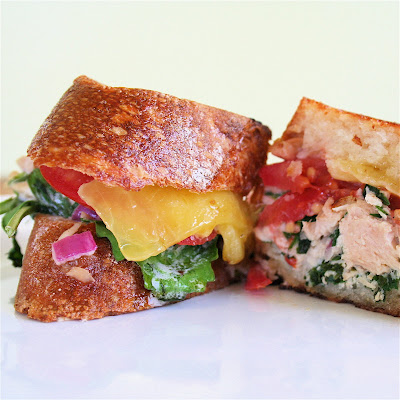
So, I am happy to report that the American Tuna I recently smothered with cheese and wedged between two pieces of buttered bread tastes just as delectable when prepared in a healthy manner. These open-faced sandwiches, made with the same tarragon-tuna salad prepared for the tuna melt plus a couple tablespoons of capers, make a very tasty, light lunch or dinner. Toasted olive bread is an especially nice base.

Additionally, I must report my latest egg preparation: soft-boiled. Yum. The recipe I followed produced perfectly colored and textured soft-boiled eggs. I'm not sure I'm crazy about the method, however, which calls for submerging the eggs in cold water, which makes the eggs, as expected, cold. In any case, soft-boiled eggs atop asparagus, prosciutto and mascarpone-slathered toasts make another great open-faced sandwich.

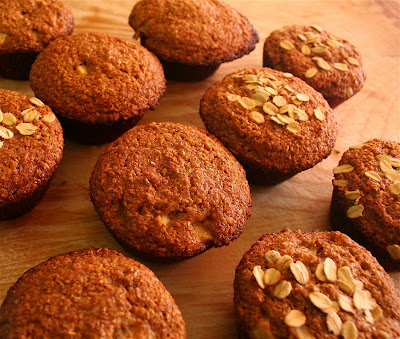
Lastly, down below, you'll see another batch of the whole-grain muffins I made several weeks ago. In this batch, mashed bananas and pecans have replaced the Fuji apples.

Asparagus Toasts with Mascarpone, Prosciutto & Soft-Boiled Eggs. To make these toasts, preheat the oven to 400ºF. Slice a loaf of french bread into four 1/2-inch thick pieces. Place on a baking sheet, drizzle with olive oil and toast until golden. Meanwhile, place four eggs in a small saucepan. Cover with cold water, bring to a boil and simmer for five minutes. Plunge the eggs into cold water. After three minutes, peel and slice the eggs. Meanwhile, bring a large pot of water to a boil. Blanch one bunch of asparagus for 30 seconds. Spread the toasts with a spoonful of mascarpone cheese. Top each with a slice of prosciutto, a few pieces of asparagus and the sliced eggs. Season with salt and pepper to taste. Serves 4.

Open-Face Tuna Salad Sandwiches
Serves 4

1 loaf of olive bread
extra-virgin olive oil
2 tablespoons mayonnaise
1 teaspoon Dijon mustard
juice of half a large lemon (about 1½ tablespoons)
kosher salt
freshly ground black pepper
1 6-ounce can American Tuna
¼ cup finely diced red onion
¼ cup chopped tarragon
2 tablespoons capers
1 tomato, thinly sliced
1 small bunch lettuce

1. Preheat the oven to 350ºF. Slice the olive bread into four thin rounds. Place on a cookie sheet, drizzle with the olive oil, and bake until golden brown, about 10 minutes. Remove from oven and let cool.

2. Meanwhile, make the dressing: Whisk the mayonnaise with the mustard and lemon juice. Season with a pinch of salt and pepper to taste. Dressing will be thin. Taste, adjusting seasoning as necessary.

3. Place tuna in a large mixing bowl. Add the onion, tarragon and capers. Pour dressing over top and combine mixture gently with a fork. Set aside.

4. Assemble sandwiches: Line bread rounds with tomatoes. Top each with a small handful of lettuce. Top each with a mound of the tuna salad. Cut in half, if desired. Serve.

The 100% whole-grain muffins pictured below are filled with mashed ripe bananas and crunchy pecans. As FarmGirl promised, this recipe can be adapted in countless ways.


Thursday, April 24, 2008

Cinder-Block Garden How-To

Hello. Over the weekend, I (OK, Ben) planted a garden. As Ben laid the bricks, tilled the soil and planted the seeds, I read him instructions from the e-book Cinder Block Gardens. The details of our experience can be read here, Feed The Soil, Not The Plants, but I've outlined the method below if you're looking for a quick read:

Step 1. Marry someone strong who will do all the heavy lifting in the project.

Step 2. Download Lynn Gillespie’s e-book Cinder Block Gardens for $19.95. Read the book.

Step 3. Make a list and head to Home Depot, Lowe’s or your local garden shop. A pickup truck is handy for this trip. The supplies weigh in total almost 1500 pounds.

Basic supplies include:
• 24 cinder blocks ($0.79 each)
• 2 bales 3.8 c.f. peat moss ($12.00 each)
• 10 50-lb. bags all-purpose sand ($2.80 each)
• 3 bags 2 c.f. compost ($6.00 each)
• 1 roll commercial-grade weed barrier ($11.00)

If you are a novice gardener, consider these additional items:
• garden hose
• spray nozzle
• sink adapter if you don’t have an outside water source
• shovel and rake
• rebar stakes and sledgehammer if building on a slope

Costs to consider down the road:
• mulch
• cages for plants such as tomatoes
• trellis for plants such as pole beans

Related Post: Garden Update

Step 4. Find a flat space and follow instructions in the e-book for garden construction.

Step 5. Consult the “Vegetable Reference Guide” chapter to decide what and how much to plant. Buy seeds or starter plants from a local garden shop. Be sure to buy the tomato plants that come with the lady with the red foot. Plant accordingly.

Step 6: Watch your garden grow.

Step 7. Consider starting a compost pile. Purchase a compost container on-line or from your home-garden center, or construct one following Ms. Gillespie’s instructions. This is the one I have my eye on. It only costs $500.


Pictured above is garlic. I planted each of these cloves in its own cinder-block hole. Each one will grow into a full bulb.

I also planted two bunches of basil, two bunches of cilantro and one bunch of oregano. Each of these grows in its own cinder-block hole as well.

Monday, April 21, 2008

Backyard Chickens & Thin-Crust Pizza

A few months ago, I mentioned I was looking forward to the day when Ben and I have room in our place to fit a freestanding freezer, (one large enough to fit a half or quarter steer.) Well, I've added something else I'm looking forward to getting as soon as space permits: chickens. I can't believe I never thought about this before. And, as far as I can tell from this new cookbook I've been reading, chickens don't seem like that much work. I guess I'll find out.

So, this cookbook is called Blue Eggs & Yellow Tomatoes. I've now tried several recipes from it including penne with asparagus, meyer lemon scones, and thin-crust pizza with brie, prosciutto and watercress. The penne was good, but way too cheesy — the recipe called for 15 ounces of ricotta and a half cup of parmesan cheese for one pound of pasta. The scones were good, too, but not as good as almond-buttermilk scones. The pizza, pictured above, however, was delectable. The dough recipe yields three eight-ounce balls and freezes well. Tonight, I thawed one of the balls at room temperature for three hours, as instructed, rolled it out and baked it topped with sautéed Swiss chard, Parmigianno Reggiano and smoked Gouda. I actually preferred this pizza to the one with brie and prosciutto. Call me crazy, but as I was eating the one topped with watercress, I kept thinking it needed something else, maybe a poached or fried egg on top.

Anyway, despite a few so-so recipes, I am still very happy to have stumbled across this book. Why? It inspired me to plant a garden. The author, Jeanne Kelley, an L.A. resident briefly describes a way of gardening — in raised beds made from plywood — that she says vegetables grow best in. I had just read an article in Acres U.S.A about a woman in Colorado doing the same sort of thing but with cinder blocks instead. I went to the Web site, The Living Farm, noted in the article  and downloaded the author's E-book called Cinder Block Gardens. It cost $19.95. Over the weekend, I went to Lowe's and Plant Depot and purchased everything I needed for my garden. I still need to figure out what I want to grow, but the blocks have been laid, the soil mixed and the ground watered. I cannot wait to start planting.

Once I get some seedlings in the ground, I'll post some pics. Seriously, if you have any desire to start a vegetable garden, check out this E-Book. You don't need a perfect patch of land — we built ours on a slightly sloped, rock-hard area measuring about seven feet by four. The author, Lynn Gillespie, has painstakingly detailed the process — the book is worth every penny.

And, once I have the space, 10 or 20 years from now, I will consult the final chapter of Blue Eggs and Yellow Tomatoes, which describes in detail how to raise backyard hens.

I think one reason why I preferred the Swiss chard pizza to the prosciutto is that I didn't have enough Brie to cover the surface and make it really tasty. This emerged from the oven looking a little freaky.

Brie and Prosciutto Pizza with Watercress
Adapted From Blue Eggs & Yellow Tomatoes (Running Press, 2008)
Yield = One 12-inch pizza

8 oz. Pizza Dough (recipe below)
8 oz. double-cream Brie (any type of Brie works fine, too)
Cornmeal
3 to 4 thin slices prosciutto
2 cups watercress or arugula leaves
1 tablespoon fresh lemon juice
2 teaspoons extra-virgin olive oil
1 garlic clove, pressed
pepper

1. Prepare the pizza dough as directed in the recipe.

2. Place the Brie in the freezer until it is firm but not solid, about 15 minutes. Trim off the rind and cut the Brie into ¼-inch-thick slices. Arrange the slices on a waxed-paper-lined pan and refrigerate. (I didn't do this. I think if you use the really good stuff, this step might be necessary, but for regular Brie, leaving it at room temperature should be fine.)

3. Position one rack in the bottom third of the oven and preheat it to 400ºF. Sprinkle a large, heavy baking sheet baking sheet lightly with cornmeal (about one tablespoon).

4. Roll the pizza dough out on a lightly floured surface to a 12-inch round. Transfer the dough to a prepared sheet. Distribute the Brie evenly on top of the dough. Bake the pizza until the Brie melts and the crust is golden brown on the bottom, about 15 minutes. Transfer the pizza to a cutting board. Distribute the prosciutto evenly on top of the pizza.

5. Toss the watercress with the lemon juice, olive oil, and garlic in a medium-sized bowl. Top the pizza with the watercress and season with pepper. Cut into wedges and serve.

Pizza Dough
Adapted From Blue Eggs & Yellow Tomatoes (Running Press, 2008)
Yield = Three 8-oz. Balls Pizza Dough

1 cup lukewarm water
1½ teaspoons active dry yeast
2¼ cups unbleached all-purpose flour
½ cup white whole wheat flour (regular whole wheat flour works fine, too)
3 tablespoons vital wheat gluten
1½ teaspoons kosher salt
¼ cup extra-virgin olive oil

1. Whisk the water and yeast together in a two-cup measuring cup and let stand for 5 minutes.

2. Combine the flours and salt in a food processor and pulse to blend. Whisk the olive oil into the yeast mixture. With the food processor running, pour the yeast mixture through the feed tube and process until the dough forms a ball, about 1 minute. (If the dough does not form a ball, add lukewarm water by the teaspoons until the dough comes together.)

3. Knead the dough briefly on a lightly floured surface for about one minute. Brush a large bowl with olive oil. Transfer the dough to a bowl and turn the dough to coat it with oil. Cover the bowl with a clean towel and let the dough stand until it doubles in volume, about 1½ hours.

4. Punch the dough down. Divide the dough into three even balls, about eight-ounces each. (Refrigerate up to two days or freeze for one month. Let refrigerated dough stand for one hour and frozen dough thaw four hours at room temperature before rolling.)

Same dough as pictured above, but topped with sautéed Swiss chard, Parmigiano Reggiano and smoked Gouda:

Wednesday, April 16, 2008

American Tuna

As I mentioned a couple of days ago, I've made a new discovery: American Tuna. Now, before you (mom) start freaking out that "women of child-bearing years should not be eating tuna," give me a minute to explain. This tuna, caught in the Pacific Northwest, is young albacore tuna and unlike most of the tuna caught today, hasn't had time to accumulate many toxins. Older albacores, blue fins and yellow fins — the varieties most often packed into cans today — can be over 40 years old and pose the biggest risk to consumers.

Let me tell you a little about this company, too. Six families make up the American Tuna fishery, which is based out of San Diego. Every June, the American Tuna fleet (five boats) departs the Port of San Diego and heads to the Pacific Northwest. These fishermen, each equipped with little more than a fishing pole, reel in young albacore tuna one at a time. (If you have a moment, visit the American Tuna Web site and watch them in action — it is amazing!) When their boats are filled, they deliver the tuna to canneries located along the coasts of Oregon and Washington. The fleet does not return to San Diego until November.

At the canneries, the fish are hand-filleted, hand-packed, canned and sealed. The tuna is cooked in the can in its own juices. Most canned tuna today has been cooked (often two or three times) as a whole fish and mixed with soy products, vegetable broth, pyrophosphate, salt, water and/or oil before being canned. American Tuna, in contrast, contains one ingredient: albacore tuna. (In the flavored varieties, however, garlic, jalapeno and salt are added in small quantities.)

American Tuna contains more omega-3 fatty acids than conventional brands. A two-ounce serving of American Tuna provides 2.6 grams of omega-3 fatty acids whereas a two-ounce serving of Starkist tuna provides 0.36 grams of omega-3 fatty acids. What accounts for the dramatic difference? Young albacore living in the cold waters of the Pacific Northwest have more body fat and therefore a higher amount of omega-3 fatty acids. When they migrate to warmer waters, they lose their body fat along with many of these beneficial nutrients.

What else can I say about this company? Oh, they belong to the American Albacore Fishing Association (AAFA), a family-run, 21-boat association operating out of San Diego, which the Marine Stewardship Council (MSC) recently certified as a sustainable fishery, making it the first and only tuna fishery in the world to bear this eco-label. MSC is an independent organization that promotes responsible fishing practices. Moreover, the Monterey Bay Aquarium's Seafood Watch places North Pacific troll- and pole-caught tuna (such as American Tuna) on its "best choice" list.

If you are interested in learning more, read on: Tuna, At Last, Without All The Guilt, The Bulletin

Whole Foods Markets nation wide carry American Tuna.

Oh, and this tuna melt, packed with tarragon, was amazing.

Tarragon Tuna Melt
Serves 4

2 tablespoons mayonnaise
1 teaspoon Dijon mustard
juice of half a large lemon (about 1½ tablespoons)
kosher salt
freshly ground black pepper
1 6-ounce can American Tuna
¼ cup finely diced red onion
¼ cup chopped tarragon
1 loaf of bread, bakery-style French or Italian
softened butter
1 tomato, thinly sliced
1 small bunch arugula
grated cheddar cheese


1. Make the dressing: Whisk the mayonnaise with the mustard and lemon juice. Season with a pinch of salt and pepper to taste. Dressing will be thin. Taste, adjusting seasoning as necessary.

2. Place tuna in a large mixing bowl. Add the onion and tarragon. Pour dressing over top and combine mixture gently with a fork. Set aside.

3. Slice bread into eight rounds. Spread one side of each with the softened butter. Turn bread butter-side down. Begin assembling sandwiches: Place a small handful of arugula on four of the rounds. Top each with a mound of the tuna salad. Top tuna with tomato slices. Top tomato with cheese. Cover with bread.

4. Heat a large nonstick skillet or griddle over medium heat. When hot, add a small dab of butter, then place sandwiches on the cooking surface. Cook until golden brown. Carefully flip each one, and cook on other side until golden brown.

5. Remove from heat, cut in half, and serve.

Purchase American Tuna at your local Whole Foods Market.


Friday, April 11, 2008

Baked & Scrambled

I wasn't kidding. I've been eating a lot of eggs. But i'll cool it after this post, because I've made a new discovery: American Tuna. I'll have more to say about the tuna later. For now, I'll concentrate on the eggs.

So, just a few quick things. Shortly after Easter, a friend forwarded me an on-line Whole Foods newsletter all about eggs ... shocker ... and I made this recipe for huevos rancheros cups. The recipe was pretty good, but I must admit, baked eggs taste best, at least in my experience, when baked in ramekins. I've included two recipes here, one for the most delectable baked eggs — my family makes them every Christmas morning — and one for the huevos rancheros cups, which are fun to make and fun to eat, but not as tasty as water-bath, ramekin-baked eggs smothered with Gruyère cheese, Tabasco and herbs.

Incidently, I've slowly been making my way through Heat, and I recently stumbled across as passage, which I'd like to share with you. At this point in the book, Bill Buford, on a quest to learn how to make fresh pasta, has traveled to Italy where he discovered that an egg, “provided it was a very good egg,” was the most important ingredient in the pasta-making equation:

“If the white was runny you knew the eggs had come from a battery-farmed animal, cooped up in a cage, and the pasta you made from it would be sticky and difficult to work with…[These yolks] were pale yellow, like those most of us have been scrambling for our urban lives. But a proper yolk is a different color and, in Italy, is still called il rosso, the red bit, arising from a time when you ate eggs in spring and summer, the egg season, and they came from grain-fed, half-wild, not just free-ranging but virtually proprietorial chickens that produced a yolk more red than yellow, a bright intensity that you can see today if you’re lucky enough to get your eggs not from a supermarket but a local mercato or a small farm.”

Anyway, if you are not sick of reading about eggs, here are links to two articles, one about a New Jersey farm that supplies wonderful eggs to the Fair Food Farmstand in Philadelphia and one about Don Davis, the man who brings the eggs I have been enjoying to the San Clemente farmers' market every Sunday:

San Clemente's Sun Post News: Good Eggs Make Good Eggs
Philadelphia's The Bulletin: Liquid Gold

The Best Baked Eggs
Serves 8

3 T. finely chopped parsley
1 T. finely chopped thyme
1 T. finely chopped rosemary
1 T. finely chopped sage
1 T. unsalted butter, softened
½ cup heavy cream
Tabasco to taste
8 large eggs
Kosher salt and freshly ground pepper
8 T. grated Gruyère cheese

1. Combine herbs in small bowl. Butter 8 4-oz ramekins with the softened butter. Pour 2 teaspoons cream, 1 teaspoon herbs and a few dashes Tabasco in each ramekin.

2. Break one egg into each ramekin, spoon 1 teaspoon cream over each egg, sprinkle with herbs, season with salt and pepper to taste and top each egg with 1 tablespoon of grated cheese.

3. Preheat oven to 400˚F. Boil water in a teakettle. Place ramekins in baking dish. Pour boiling water in dish so that it comes 1/3 of the way up the sides of the dishes. Bake 10-11 minutes for medium cooked eggs.

For the recipe for the best scrambled eggs, visit the Sun Post News' Web site:Good Eggs Make Good Eggs

Huevos Rancheros Cups
Adapted from Whole Foods Market
Serves 8

8 (5-inch) corn tortillas
Canola oil spray
1 (15-ounce) can refried beans
8 large eggs
kosher salt and pepper
¼ cup queso fresco or other fresh cheese, crumbled
Tabasco (optional)
½ cup salsa
¼ cup chopped fresh cilantro

1. Preheat oven to 350°F and oil a standard 12-cup muffin tin.

2. Heat corn tortillas one at a time in a dry skillet over medium-high heat for 15 to 20 seconds on each side, just until they are soft and pliable. Spray each warm tortilla with canola oil on both sides. Press and fold each tortilla into a muffin cup. Place a small ball of foil in the center to hold in sides of tortillas. Bake 5 minutes.

3. Remove foil and add 2 tablespoons of refried beans to each corn tortilla cup, pressing them down into bottom of cup. Make an indentation in the center of the refried beans and carefully crack an egg into each indentation. Season each egg with a pinch of salt and pepper. Top each with a pinch of cheese and a splash of Tabasco if desired. Bake in the middle of the oven until whites are just set, about 15 minutes.

4. Remove tortilla cups from the muffin pan carefully, using 2 spoons or small spatulas. Top with a spoonful of salsa and sprinkle with more queso fresco and cilantro. Serve immediately.

Don Davis with his eggs at the San Clemente farmers' market:

Tuesday, April 8, 2008

New Theory: Everything Tastes Better With An Egg On Top?

I know. My egg consumption is out of control. I can't promise the end is in sight either, so please just bear with me as I plow through a few more dozen.

On another note, I have a story to recount about my husband that you might not believe. Last night, Ben almost threatened not to accept my "friend request" on Facebook. I know. Unbelievable. It was one of the sadder moments of my life.

This is what happened. Yesterday after dinner, while Ben was washing dishes, I mentioned that I had just become friends (on Facebook) with one of his old hockey buddies. Great, Ben said, and then admitted to feeling bad about not checking his email more often and rarely responding in a timely fashion to "friend requests."

"You have a Facebook account?" I asked as I typed his name into the search box. "I'm going to invite you to be my friend."

Brace yourself, this is where it gets sad. Ben turned to me and said, "OK, but don't expect ... " stopping mid-sentence upon seeing my face.

"What?" I asked. "You to be my friend?"

"Well, it's just that ... it's just that I'm never ..."

It was too late. Ben could utter no words that would repair the damage. "It's cool," I said, as the world as I have known it silently shattered. We didn't speak for like 2 minutes. It was terrible.

When Ben finished the dishes, he hopped on his computer and confirmed my friend request. While my heart still stung, I couldn't bear the silence, and I appreciated the cyber gesture. I know, deep down, my love of life meant no harm. (I apologize for all the drama ... maybe it's the eggs?)

On another note, I learned on Sunday that one of the vendors (I forget the farm's name) from Carlsbad will be bringing these zucchini blossoms to the San Clemente farmers' market every week from now until the end of summer. These might be one of my favorite foods.

I think the best way to prepare them is this: Buy some goat cheese. If you feel like it, season it with salt, pepper, some herbs, shallots, whatever. If you don't, don't — plain goat cheese works just fine. Place a small — small — amount of goat cheese inside each one. Don't over-stuff ... it doesn't make them better. Pinch the flower closed. Place a small amount of milk or buttermilk in a shallow vessel. Place a small amount of cornmeal in another shallow vessel. Heat a nonstick pan over medium fire. Add a mixture of oil and butter. Meanwhile, dip each blossom in milk and then in cornmeal. When the butter begins sizzling, add the blossoms to the pan. Let them cook until golden brown. Remove and serve with anything.Yum.

Also, I just tried the curry spaghetti from Delaney's Culinary Fresh. I have sworn by the red pepper linguini in the past — still my favorite, I think — but this curried spaghetti was awesome. I didn't add anything to it, except for some reserved cooking liquid, salt and pepper. Oh, and a fried egg.

And I sort of, though not very meticulously, tested my theory about cooking fried eggs slowly. In a nonstick pan, I heated some butter over medium fire. I added the egg when the butter sizzled. I covered the pan, and after a few minutes, when it looked done through the foggy transparent lid, I removed the egg and threw it on my pasta. There is something really special about an egg yolk over pasta. Or rice. Or salad. Or bread. Or everything, I have concluded.

Friday, April 4, 2008

Poached Eggs Over Flax Bread

So, as you know, I’ve been eating a lot of eggs. I’ve been cooking them in various ways — scrambled, poached, and even baked into tortilla shells (thanks for the recipe, Ann … next Friday I’ll post my results) — and I’m starting to notice a pattern: Eggs need to be coddled. Pardon the pun, but what I mean is that eggs, prepared in any way, need to be cooked gently — slowly over low heat. And, as I mentioned recently, if you start with really fresh eggs all you need is salt, pepper and a splash of Tabasco.

Now, I haven’t tested my theory on fried eggs, but I will, and I’m guessing this method won’t fail me.

As for the bread you see pictured, I’m still in disbelief that it emerged from the oven looking somewhat like a loaf of bread. Let me explain. I had been reading this book about omega-3 fatty acids and became inspired to make flax-seed bread. I found a recipe on the Internet, but the quantities were given in gram form. Not to worry, I converted the grams to ounces, and then from ounces to cups. ( My digital Salter scale is still in storage.)

I mixed together all the ingredients, kneaded the dough briefly — the recipe told me to do so — and placed the ball in a bowl. Twenty-four hours later, the dough had not budged. I couldn’t bear the thought of throwing it away, however, so I dissolved another packet of yeast in some water, let it bloom and then mixed it with some white flour. I broke the flax-seed rock into my new flour-water-yeast mixture and began kneading. After 10 minutes, I placed the dough in a bowl to rise, I hoped, once again.

Twenty-four hours later, the dough had made a little bit of progress, so I threw it in the oven before it could collapse on me. The results, well, let’s just say, were better than I had expected? Made mostly with whole wheat flour and loaded with flax seeds, this bread tastes a little nutty and very wholesome.

Yesterday afternoon, while we celebrated my uncle Jerry’s birthday, Aunt Vicki sliced up some of this bread, toasted it up and served it with butter and orange marmalade. It actually made a nice little snack. And cousin Jay, after slicing the bread very thinly, made a tasty looking avocado and turkey sandwich. The flax bread, although having the effect of feeling "like a steel glove in the stomach," as uncle Jerry noted, was a hit.

Not much else to report. Here's the latest military article: Why The Marines? Why Now?

A Few Recent Discoveries For Making Good Eggs:

1. Buy fresh eggs.
2. Use butter.
3. Cook the eggs slowly over low heat.
4. Season with salt, pepper and a splash of Tabasco.

Perfect Poached Eggs

vinegar (a squeeze or lemon or lime juice works well too)
eggs, however many you want
kosher salt
freshly ground black pepper
Tabasco

Bring a small, shallow saucepan filled with water to a boil. Add a capful of vinegar. Crack eggs, one at a time, into a ramekin or small vessel. Reduce the heat of the pot to just a simmer — seriously, the water should hardly be moving. Gently drop the egg into the water. Turn up the heat to achieve that very subtle simmer, then add another egg in the same manner to the pan.

To test for doneness, remove one of the eggs with a slotted spoon. Gently press the yolk with your finger. If it feels too soft, return egg to water. Cook a total of about 3 to 4 minutes. Remove with a slotted spoon and serve over toast. Season with salt, pepper and Tabasco, if desired.

Wednesday, April 2, 2008

Whole Grain Muffins Round Two & A Favorite SNL Skit

Yesterday morning, I finished off the batch of cranberry-orange pecan muffins I had made last week. It seems I am already quite accustomed to my morning muffin routine, because I couldn't let another day pass without making a new batch. I entered "bran muffin" into the Food Blog Search engine you see here on the left and found a number of tempting recipes.

Of all the bran recipes I browsed, however, I chose to make the "Best Bran Muffins" featured on the blog Farmgirl Fare. I chose FarmGirl's for a number of reasons. For one, these muffins are made entirely with whole grains: wheat bran, oat bran and whole wheat flour. Second, FarmGirl admitted she disapproves of recipes for bran muffins that call for some type of bran cereal, which she believes are overpriced and over processed — I think she makes a good point. And finally, FarmGirl's mother declared these muffins the "best she had ever taste." I was sold.

As FarmGirl promised, these muffins are moist, delicious and very adaptable. I added a couple of diced apples, which add a nice flavor, but as FarmGirl notes, this recipe can be altered in countless ways.

Now, I have to admit, as I was whisking the dried ingredients together, all I could think of, pardon the bathroom humor, was two words: Colon Blow. I googled and found a link to both the video of the SNL skit and the written transcript. If you need a good laugh, this video is only one and a half minutes long and will certainly do the trick. Oh man was Phil Hartman funny.

Farmgirl Susan's Basic Bran Muffin Recipe
Adapted from the blog Farmgirl Fare
Makes about 9 large or 17 small muffins

2 cups (3oz/86g) wheat bran
1 cup (5oz/141g) oat bran
1 cup (6oz/170g) whole wheat flour
2 teaspoons (12g) baking soda
1 teaspoon (6g) baking powder
1/2 teaspoon (4g) salt
2 large eggs
2/3 cup (5oz by weight/156g) milk
2/3 cup (5-1/2oz/156g) yogurt
1/3 cup (2-1/4oz/65g) canola oil
1/3 cup (3-3/4oz/108g) molasses, cane syrup or brown rice syrup*
1/3 cup (3-3/4oz/108g) honey
2 fuji apples, peeled and diced
1 teaspoon (6g) vanilla extract (optional)
rolled oats for sprinkling

* Note: You can use all honey or all molasses instead if desired.

1. Place oven rack in middle of oven and heat oven to 375ºF. Grease or spray a standard size muffin pan, or line cups with paper liners.

2. Combine wheat bran, oat bran, whole wheat flour, baking soda, baking powder, and salt in a large bowl and set aside. Combine eggs, milk, yogurt, canola oil, molasses, and honey in a small bowl and mix well. Pour wet ingredients into dry ingredients and mix with a rubber spatula just until combined. Fold in diced apples.

3. Fill muffin cups till just below the rim with the batter. Sprinkle with rolled oats if desired. Bake until a toothpick inserted in the center comes out clean, about 20 minutes for small muffins and 25 minutes for larger. Cool muffins in pan for 10 to 15 minutes, then carefully remove from pan and serve warm, or let cool on a wire rack.


Variations:
Blueberry-Bran Muffins
Makes about 10 large muffins. Follow Basic Bran Muffin recipe, but gently fold 1½ cups of fresh or frozen blueberries into the batter. There is no need to defrost frozen berries, but do quickly rinse off any ice with cold water.

Blueberry-Banana-Bran Muffins
Makes 12-14 large and very moist muffins. Follow Basic Bran Muffin recipe, but stir mashed very ripe banana (2 small bananas) into wet ingredients. Then gently fold 1½ cups of fresh or frozen blueberries into the finished batter. Baking time may need to be increased to 25 to 28 minutes.

Cranberry-Orange-Bran Muffins
Makes about 10 large muffins. Follow Basic Bran Muffin recipe, but replace the 2/3 cup milk with 2/3 cup orange juice and omit the vanilla extract. Stir 1 cup orange flavored dried cranberries or regular dried cranberries to finished batter. For muffins with more orange flavor, stir 1 teaspoon finely chopped or grated orange zest into the wet ingredients.