Sunday, September 30, 2007

Homemade Granola Bars

Ben, my husband, about to begin his third phase of training as a Marine Officer, has one more obstacle to overcome: a 14-hour “field exercise.” Although I can’t say I know all the details, I do know he’ll be hiking through the woods of Quantico while periodically being attacked and ambushed. Ground fighting will ensue. At 0500 tomorrow, the madness begins.

Luckily, he has the proper fuel — some homemade granola bars. While I'm not sure he'll actually be able to take these with him tomorrow — I believe the early morning swim would ruin them — he always has a few on hand for when his daily activities interrupt mealtimes.

For these bars, I first have to credit my sister, Little Lindis, for being an exhausted fourth year medical school student with little time during the day for even a snack, let alone time in the evening to make herself more than popcorn and boiled hotdogs for dinner. Upon hearing about this demanding schedule, my mother of course would not stand for it and decided to make for her firstboorn a delectable and portable snack. Lindis' overwhelmingly positive response encouraged my mother to make some for Ben too, also often in need of a quick boost in the middle of the day.

Alas, the middle child could only experience this delicacy by testing the recipe herself. (JK Mom, you make me lots of goodies too...just not granola bars.) And I’m glad I had to learn the recipe myself for a few reasons. For one, I had never cooked with brown rice syrup or natural cane sugar — two sweeteners that enter the bloodstream more slowly than refined sugars, causing less of a spike in blood sugar levels. Second, the recipe requires no baking — it couldn’t be simpler, really. And finally, the flavors in these bars can be adapted in so many ways: any nut or dried fruit can replace the almonds and the cranberries, and while I haven’t tried this yet, I think a few chocolate chips or chopped pretzels would make nice additions as well.

My sister stores her granola bars in the freezer, but then again, she freezes everything — the door can barely stay shut. Also, I think the Quantico mail system proved freezing these bars to be unnecessary. My mother once mailed Ben a package filled with her homemade powerbars, and he received them, no joke, a month later. The bars tasted delicious nonetheless. (My mother had wrapped each bar very tightly in plastic wrap, but still, a month is a long time.) Ben gobbled them up.

Cranberry-Almond Bars
Adapted from Heidi Swanson’s 101cookbooks.com
Yield = 16 bars

1¼ C. sliced almonds
1½ C. puffed brown rice cereal
1¼ C. rolled oats
1 C. dried cranberries, chopped
½ C. oat bran
3 T. finely chopped crystallized ginger
1 C. brown rice syrup
¼ C. natural cane sugar
½ tsp. salt
1 tsp. pure vanilla

Preheat the oven to 350ºF. Spread the almonds on a baking sheet and place in the oven for about 9 minutes, until fragrant and golden. Let cool, then coarsely chop. Transfer to a large bowl, and add the cereal, oats, cranberries, bran and ginger. Toss well.

Lightly spray a 9-by-13-inch baking dish with cooking spray. In a small saucepan, combine the brown rice syrup, cane sugar and salt and bring to a boil over moderate heat. Cook, stirring occasionally, until the mixture is slightly thickened, about 4 minutes. Remove from the heat and stir in the vanilla. Pour the syrup into the rice-oat mixture and toss to coat thoroughly. Transfer the mixture to the prepared dish and pack lightly with a spatula greased with cooking spray. Let cool for at least 45 minutes before cutting into 16 bars.

Note: The original recipe called for walnuts instead of almonds. Any nut can be substituted for the walnuts as can any dried fruit for the cranberries. The bars can be wrapped individually in plastic wrap, and stored in an airtight container for up to 4 days. They freeze well also.

Thursday, September 27, 2007

End of Summer Recipes

I know it's officially fall, but with the temperature in the 90s and the humidity at 80 percent, it still feels like a Philadelphia summer. And while the tomatoes and the corn have passed their prime, most farmstands still abound with each, along with many other goodies: peppers, zucchini, squash and basil.

So while the days of steamed corn and fresh tomato salad may be numbered, the summer produce can still be enjoyed in many ways: This roasted potato salad, my mother's recipe, is perhaps my favorite — and the easiest — of the bunch. The warm potatoes soak up all the flavors of the dressing — a mustard vinaigrette seasoned with rosemary and chives — making a wonderful side dish. The strata feeds many people, for a potluck perhaps, or one for a week — I've had a piece each night for the past seven days. My mother also introduced me to this corn pudding recipe, featured in Gourmet earlier this summer, a nice change from corn on the cob. And the chowder, filled with bacon, peppers and potatoes, should be saved for some colder weather, but savored before the hearty-chili season really begins. Enjoy!

Corn Chowder
Yield = 2 quarts

3 slices bacon
4 cups chicken stock
5 ears of fresh corn, kernels removed
2 red bell peppers, finely chopped
1 jalapeno pepper, finely chopped
1 medium onion, finely chopped
4 stalks celery, finely chopped
1 lb Yukon Gold or red Bliss potatoes, peeled and cut into ½-inch dice
kosher salt and pepper to taste
5 scallions, thinly sliced
1½ cups whole milk
grated cheddar or pepper jack cheese

Place bacon on a double layer of paper towels on a plate. Cover with another layer of paper towels and microwave on high at two-minute intervals until crisp, about 6 minutes. Meanwhile place chicken stock, corn, peppers, onions, celery and potatoes in a medium saucepan and bring to a boil. Season with kosher salt and pepper to taste. Add the scallions and the milk. Break the crisp bacon into the soup. Stir, taste and add more salt and pepper if necessary. Serve with grated cheese if desired.

Summer Vegetable Strata
Serves 6 to 8

6 slices white sandwich bread
kosher salt and pepper
2 tablespoons olive oil
1 small onion, julienned
2 small yellow squash or zucchini
1 cup of roasted red peppers, julienned
2 cups milk, (1%, 2% or whole)
5 large eggs
½ cup pepper jack cheese
a pinch of crushed red pepper flakes
1 cup of basil leaves
¼ cup of chopped chives
1 ball of fresh mozzarella, cut into ½-inch thick slices to yield about a ½ cup

Preheat the oven to 350ºF. Lightly butter a 9-by-13-inch baking dish. Remove the crusts from the bread and crisp lightly in the toaster. Once cooled, arrange in a single layer in the bottom of the dish. Season with salt and pepper to taste.

Over medium heat, sauté the onion in the oil until soft and slightly caramelized, about 10 minutes. Meanwhile, trim the ends off the squash, cut them lengthwise into quarters, and then crosswise into ¼-inch thick slices. When the onion is slightly brown, add the squash and cook for 2 minutes longer. Add the peppers and cook for a minute longer. Season mixture with salt and pepper to taste and remove from the heat.

In a large bowl, whisk together the milk, eggs, half of the cheese, pepper flakes, basil, chives and a big pinch of salt. Using a slotted spoon, transfer the vegetables to the baking pan, spreading them evenly over the bread. Pour the milk mixture over top. Scatter the remaining cheese and mozzarella over the top. Bake for 40 minutes. Let cool for 10 minutes before serving.

Corn Pudding with Scallions
Serves 8 to 10 as a side dish

4 cups corn (from 6 ears)
4 scallions
3 tablespoons all-purpose flour
1 tablespoon sugar
¼ teaspoon kosher salt
2 cups 2% milk
4 eggs, lightly beaten

Preheat the oven to 350ºF with rack in the middle. Butter a 2½-qt shallow baking dish or individual crème brulee dishes or ramekins.

Pulse half of the corn in a food processor until coarsely chopped. Transfer to a bowl and stir in the scallions, flour, sugar, salt and remaining corn. Whisk together milk and eggs and add to bowl with the corn. Stir until just combined. Pour into baking dish or ladle into individual dishes.

Bake until the center is just set. About 35-40 minutes for individual dishes and 45 minutes to one hour for one large dish. Let stand 15 minutes before serving.

Roasted Potato Salad
Serves 6 to 8

2½ lbs. small red Bliss potatoes
2 garlic clove, chopped
5 tablespoons olive oil
kosher salt and pepper
1½ tablespoons red-wine vinegar
1 tablespoon grainy mustard
1 tablespoon minced chives
2 sprigs fresh rosemary

Preheat the oven to 475ºF. with racks in the upper and middle levels. Wash the potatoes, dry and cut into ¼-inch thick slices. Arrange in a single layer on two rimmed baking sheets. Scatter one clove of garlic and one tablespoon of oil over each sheet. Season to taste with salt and pepper. Toss the potatoes with your hands to evenly spread the oil and garlic, then return slices to a single layer. Place pans in the oven and bake for 20 minutes or until the potatoes are knife tender.

Meanwhile, in a large bowl, whisk together the vinegar, remaining three tablespoons of oil, chives and rosemary. When potatoes are done, remove from the oven and add to the bowl of dressing. Toss and serve immediately or at room temperature.

Sunday, September 23, 2007

Joel Salatin and Polyface Farm

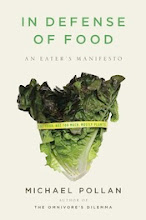
I have to admit I am very excited to say I have finally visited Polyface Farm in Swoope, VA. Not only did I get to hear the charismatic Joel Salatin describe his innovative farming techniques for nearly three hours, I got to stand in the barn where Michael Pollan had his epiphany during his week-long stay at Polyface.

In the picture above, Joel Salatin stands in the open-sided shelter where his cows spends a portion of the winter. During the winter, the cows eat hay (dried grass accumulated throughout the growing season), and live on a bedding consisting of woodchips, sawdust and old hay to absorb the cows' excrement. When the heavy cows tread on their nitrogen-rich manure and on the carbon-rich bedding, packing it together, they allow the mixture to ferment (anaerobic composting). By adding corn to the bedding, Salatin entices his pigs to turn the bedding into compost: When the cows return to pasture in March, the pigs dig through the densely packed bedding, searching for the tasty fermented corn, aerating the pile and turning it into compost for the spring.

Here, in this barn, Salatin says Pollan realized how Polyface contrasts so sharply with conventional farms.

Salatin considers himself a grass farmer: a farmer who relies on the free energy of the sun to grow grass and in turn feed animals, ultimately enabling all parties involved — animal, land and man — to prosper. For example, through controlled grazing, Salatin allows his ruminants to spread and fertilize grass seed, creating a healthier and more productive land, which in turn produces healthier and more productive cows, and in the end provides him with more meat.

But at Polyface, that's just the beginning. With inventions such as the Eggmobile, Gobbledygo, and Raken house, everything is connected. The grass, after grazed by the cows and sanitized by the chickens, will grow back thicker and healthier. The grass doesn’t need fertilizer to grow because the cows spread and fertilize the seed with their manure; the cows don’t need grain — a food their ruminant stomachs can’t digest without the help of antibiotics — because they have grass; the laying hens require little purchased feed, because they dine not only on grass, but also on fly larvae and insects in the cow’s manure; the land doesn’t need pesticides to protect against pathogens because the hens thoroughly sanitize any land the cows have grazed; and the land furthermore doesn’t need artificial fertilizers because the hens fertilize it with their nitrogen-rich manure.

By relying on the sun, Salatin needs little oil and purchased food to grow his healthy, tasty, pastured meats — not only a wise business move, but also a boon to the environment.

After reading Pollan's The Omnivore's Dilemma in March, Ben and I have been dying to visit Polyface. To say the least, the weekend was memorable. View all of the photos here, and many of the highlights below:

Ben loves the pigs, and the pigs love Ben.


Ben and I stand with Joel in the barn where Michael Pollan had his epiphany about Polyface Farm.


Pigs that Joel is "finishing" on acorns and other nuts from the forest.


Chickens in the "Raken" house.


Joel explains the chicken-cow symbiosis while his laying hens huddle around him.


Joel pulling a crate that houses his pastured chickens.


The pastured chickens move underneath the crate as Joel pulls it to a fresh patch of grass.


The eggmobile that houses the laying hens that follow the grass-fed cows.


The group of people we toured with for three hours walk with Joel towards the barn.


In the "Raken" house, Joel shows a baby rabbit to a girl.


Thursday, September 20, 2007

Oktoberfest

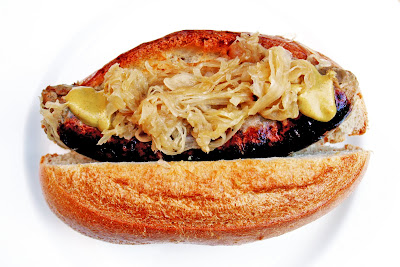
Wanting to prepare a traditional Bavarian dish in honor of Oktoberfest, I wandered through the Italian Market in search of sausage. From Cappuccio's Meats, I purchased a pound of apple and cinnamon pork sausages, assured by the butcher they wouldn't be too sweet.

While these South-Philly links unlikely resemble those served in German pubs, they work perfectly in this recipe: The cinnamon in the sausage pairs nicely with the grated apples and juniper berries in the braise. After 30 minutes of gentle simmering, the sauerkraut absorbs all of these flavors as well as all the juices from the sausage, becoming a tasty condiment for these hoagies.

And while I have only tasted one of the 12 seasonal beers I picked up at the Foodery — the Hofbraü, one of the six local beers served at the Munich festival — I think they all have been inherently designed to taste good with pork or any of the other Oktoberfest fare — roast ox tail, rotisserie chicken, spaetzle.

Heartier than a Pilsner but lighter than a Bock, the Hofbraü is a great fall beer, and tasted even better with my Bavarian hoagie. This Sunday, cheer the Eagles to their first victory while savoring braised sausage with sauerkraut and imbibing in an autumn-spiced Dogtoberfest (Flying Dog Brewery), a pumpkin-spiced Punkin (Dogfish Head Craft Brewery) or any of the other fun Oktoberfest brews.

Read all about the tradition of this renown Munich festival below:

Tapping a keg before a crowd of thousands at noontime tomorrow, the Lord Mayor of Munich will commence the festivities of Oktoberfest, a centuries-old tradition attracting revelers from across the globe. In the next two weeks, more than six million visitors will relish classic German fare such as sausages, sauerkraut, roasted ox tails and spaetzle, while enjoying traditional song and dance. Some will watch the legendary crossbow competitions, others the various parades, but all will celebrate the beer — a dark-colored, high-octane brew, made specially for the occasion.

The first Oktoberfest began on October 12, 1810, when the Bavarian Crown Prince Ludwig and Princess Therese organized a festival to commemorate their marriage. On a meadow outside the city gates, the citizens of Munich celebrated with singing, dancing and feasting, a five-day event ending with a large horse race. The townspeople named the field “Theresienwiese” (after the bride) or “Wiesn” for short, a term that has lasted for nearly 200 years.

As each successive festival became longer and more elaborate, the royal couple eventually pushed the start date back, taking advantage of the warmer September weather. Historically, however, Oktoberfest has always ended on a weekend in October.

Over the years, this occasion has deservingly earned the title the “Largest People's Fair in the World.” Pitched across the 100-acre Wiesn, fourteen tents — some large enough to cover 10,000 seats — form a mini village. Under these tents, 12,000 employees including 1600 barmaids annually serve over 200,000 pairs of sausages, 450,000 rotisserie chickens, 100 roasted oxen and 6 million steins of beer.

Oktoberfest has not only inspired cities all over the world to organize similar festivals, but also breweries to create special concoctions, some honoring the “Marzen-style” brew, the style enjoyed by Germans at the original Oktoberfest. Marzen means March in German, and before the invention of refrigeration, March marked the last month beer could be brewed before the hot weather moved in. Brewers stored their beer in ice caves until October when the cool air returned, welcoming these brews and inspiring harvest festivals, the immortalized Bavarian wedding being one of them.

In 1872, the Munich brewery Spaten created the first Oktoberfest beer, and today, only six local breweries (Spaten, Augustiner, Paulaner, Hacker-Pschorr, Hofbraü and Löwenbräu) have permission to serve their seasonal brews at Oktoberfest. Each of these companies abides by the “Reinheitsgebot” or German Purity Law enacted in 1516, stipulating that beer may be brewed with only four ingredients: malt, hops, water and yeast.

In general, however, the numerous beers created each fall in honor of the festival tend to be amber in color, medium to full-bodied in alcohol, and malty in taste. Some Oktoberfest brews such as Sam Adams, Brooklyn Brewery, Stoudt’s, Saranac, Flying Dog and Flying Fish use only imported European ingredients (hops and malt). Some brewers age the beer slowly in the tradition of those made for the Munich festival, and others add seasonal flavorings: Weyerbacher Brewing Company of Easton adds pumpkin as well as cinnamon, nutmeg, cardamom and cloves to its Imperial Pumpkin Ale; and Dogfish Head Craft Brewery of Milton, Del., adds pumpkin and brown sugar to its Punkin Ale.

Sausage And Sauerkraut

1 tablespoon olive oil
4 fresh sausages*
1 onion, peeled and thinly sliced
10 whole juniper berries
kosher salt and pepper
1¾ cups chicken stock
2 lbs. sauerkraut, rinsed
2 apples, such as Granny Smith or Honey Crisp, peeled and grated
* Cappuccio's on the Italian Market makes delectable homemade sausages (215.922.5792)
* The Fair Food Farmstand sells several wonderful varieties as well from Country Time Farm and Jamison Farm

Heat the oil in a 12-inch skillet over medium-high heat. Brown the sausage on all sides, then transfer to a plate. Add the onion and juniper berries and sauté until the onions are tender, about five to seven minutes, seasoning with salt and pepper to taste. Add the stock, sauerkraut and apples, and stir to combine, scraping any browned bits from the bottom of the pan. Nestle the sausage back into the sauerkraut mixture, bring to a simmer, cover and cook over low heat until the sausages are cooked through and some of the liquid has evaporated, about 25 to 30 minutes.

Serve with a variety of mustards and hoagie rolls if desired.

Sunday, September 16, 2007

Green Tea Madeleines & Birchrun Hills Farm Blue

I realized I forgot to report a few other details from my little gathering last weekend. On Sunday morning, my friends and I slowly recovered from the late-night festivities with the help of coffee for some, tea for others, and green tea madeleines for all. I had some leftover batter for these delicate treats from a batch I had made a few days ago (for an article I wrote about T Bar, a relatively new shop that makes incredible iced green tea lattes), and baked them off while the coffee brewed — they literally take only ten minutes in the oven. The recipe had been adapted from a recipe I cut out of this past April's Bon Appetit for madeleines from New York's renown Payard Patisserie & Bistro. The recipe is excellent — very lemony — and a couple of teaspoons of matcha (green tea powder) add a nice, but very subtle touch. Truthfully, the green tea flavor is hardly detectable, so double the amount of matcha for a more pronounced flavor.

And while I mentioned that we stopped by the Birchrun Hills Farm stand at the Sunday Headhouse Farmers' Market, I forgot to mention that we all enjoyed a wedge of Birchrun Blue with our hors d'ouevres the previous evening. Sue Miller makes this creamy blue cheese from raw milk drawn from the cows on her dairy farm in Chester Springs. I recently visited her beautiful farm, met many of her precious cows and learned about the intensive cheese-making process. I also learned that a snack Sue makes — melted Birchrun Blue over a toasted baguette drizzled with honey — has been named "Sweet Sue" by one of her neighbors. Read more about Sue and her husband Ken's year of cheese making.

Matcha Madeleines
Yield = 30

1¼ cups flour
1 teaspoon baking powder
pinch of salt
2 teaspoons matcha (green tea powder)*
1½ sticks (¾ cup) unsalted butter
2½ teaspoons honey
4 large eggs
¾ cup sugar
2½ tablespoons packed brown sugar
1 tablespoon grated lemon peel
Special equipment: madeleine pans (3-inch-long molds)

Whisk flour, baking powder, salt and matcha in a bowl. Place butter and honey in a microwave-proof dish and microwave for one minute. Stir, and microwave 30 seconds longer or until butter has melted.

In the bowl of a stand mixer, whisk eggs, sugars and lemon peel until combined. On low speed, add half of the hot butter mixture and mix until blended. Add half of the flour mixture and mix again until blended. Repeat with remaining butter and flour mixture being careful to mix the batter just until the flour is incorporated. Let batter chill for one to three hours.

Preheat the oven to 450ºF. Butter and flour madeleine pan or pans. (Note: If you only have one pan, it is important to let each batch of madeleines cool completely in the pan. The pan should be washed, re-buttered and re-floured as well before using on a second and third batch.) Place heaping spoonfuls of the batter into the molds. Don’t worry about spreading the batter — it fills the molds and rises in the oven.

Bake five minutes. Reduce heat to 400ºF and bake five more minutes. Check madeleines: If they are golden brown around the edges and puffed in the center, remove from the oven. If necessary, continue baking. (They may take an additional five minutes.) Remove pan from the oven, and let madeleines cool completely in their molds before removing. Serve at room temperature with tea.

*Available at Asian markets. Also, the green tea taste of these madeleines is very subtle. For a stronger flavor, add an additional 1 to 2 teaspoons of matcha.

Friday, September 14, 2007

Black Prince Tomatoes & Chocolate Chip Cookies

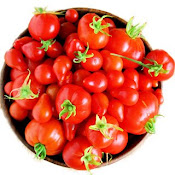
I never thought I would say that I have a favorite tomato, but as of this past Saturday I do. As I passed through Reading Terminal Market on my way to the Fair Food Farmstand, I stopped at the Livengood stand, struck by the array of tomatoes on their table. I asked one of the men to suggest a tomato for a simple salad and he handed me a Black Prince. I purchased a dozen, made my way to the Farmstand for grass-fed ground beef, then headed home.

After a slight detour that led me to purchase 10 tiki torches (the price was ridiculous, really), I found my way home and started preparing for a dinner with five friends: Bates and Will, recently married and about to move to Syria for a year; Steph and Mike, recently engaged and big fans of grass-fed beef and their new East Coast city; and our friend Jon, single and still recovering from his great Asian adventure. Oh and much to my surprise, when I greeted my friends at the door, Bug, Bates and Will's dachshund, had decided to make the trip from New York City too! Read all about the life of Bug (and Bates and Will), the latest plans for Steph and Mike's wedding in Cabo and Jon's wild last day in Hanoi.

By the light of the torches and a few candles, the six of us wholly enjoyed homemade hummus and pita prepared by Steph, olives brought by the New York crew and hamburgers made with Dr. Angusburger beef. The tomatoes, however, were the highlight of the evening. With basil from the farmstand, Claudio's fresh mozzarella, olive oil, balsamic vinegar and a touch of salt, the tomatoes made a perfect salad.

Bates particularly appreciated how the tomatoes had been cut — in irregular chunks as opposed to slices — finding them easier to eat. For these shapes, I must give credit to the chef I worked under at Fork, Thien Ngo, who always plated food with a "chaos theory" in mind. He would "trash" restaurants whose food looked like "legos" on the plate. He preferred the very natural look, believing that the plating of food reflects how much the food has been handled.

Warm chocolate chip cookies and delectable green figs from the Farmstand finished the evening nicely. The simple dinner had been a success, as had the weekend as a whole: The following day, we walked to the Headhouse Farmers' Market, where my friends all purchased cheese from Birchrun Hills Farm and met the wonderful Sue Miller. Then we walked to Reading Terminal and of course paid a visit to the Fair Food Farmstand where I showed my friends where I buy, among many groceries, grass-fed ground beef and raw milk, which we had all delighted in that morning for breakfast. And before sending them back on the Chinatown bus, we savored fresh rice noodles at Ding Ho — a perfect weekend indeed!

Soft and Chewy Chocolate-Chip Cookies
Yields about 35 1¾ oz cookies

10¾ oz unsalted butter (1 1/3 cups)
10¼ oz light brown sugar (1½ cups packed)
7¾ oz granulated sugar (1 cup)
2 large eggs
1 T. pure vanilla extract
17 oz unbleached all-purpose flour (3¾ cups)
1¼ tsp table salt
1 tsp. baking soda
12 oz semisweet chocolate chips

Cream butter and sugars together in the bowl of a stand mixer fitted with the paddle attachment, until light and fluffy. Scrape the bowl, beat again on high for one minute. Add the eggs and vanilla and beat until well blended, about another minute on medium-high speed. Whisk flour, salt and baking soda together in separate bowl. Add to butter mixture and combine with a spatula or wooden spoon until just blended. Add the chocolate chips and stir till combined. The dough will be stiff.

Portion into 1¾ oz sized balls. This is a tedious task, but it makes for beautiful and uniform cookies that bake evenly. If you have a digital scale, this is an easy task; if you have no scale, use a small ice cream scoop or some other uniform measuring device. Chill the portioned balls for at least three hours, or freeze for months.

Preheat oven to 375°. Place portioned balls nicely spaced on an ungreased jelly roll pan. Flatten slightly with the back of a spoon. Bake 8-11 minutes, rotating the sheet halfway through cooking. Keep a close watch. You want to remove the cookies from the oven when they still look slightly raw—you will think you are removing them too early. The cookies will continue cooking as they sit on the tray out of the oven. Let sit for 5 minutes on tray before removing to a cooling rack, and let cool completely before storing.

Bug, enjoying the wilderness in a Philadelphia backyard:

Sunday, September 9, 2007

Oven-dried Tomato Bruschetta

I must give credit to the Fair Food Farmstand again for providing another excellent recipe in their weekly email. A few weeks ago, after receiving eight Roma tomatoes (among many other treats) in my CSA, I opened my email to find Ann Karlen's "tried and true" recipe for oven-dried tomatoes, just the guidance I needed to preserve these seasonal gems.

The recipe required six to eight hours of cooking, so I set the oven to 200ºF, as instructed, placed the prepared tray of tomatoes inside, and went to bed. I could not believe my eyes when I opened the oven door the following morning: The plump, juicy tomatoes had shriveled into desiccated, flat disks. Seeing the dehydrated tomatoes reminded me of lifting the towel from the bowl holding the first batch of bread dough I had mixed and kneaded on my own: Doubled in bulk, seemingly alive, the dough — the transformation of the dough — inspired true amazement.

I had to try one right away. To my surprise, this withered red package tasted incredible! Unable to resist storing my homemade "sun-dried tomatoes" — my intention when I set out to make them — I assembled a little bruschetta. On a toasted baguette from Metropolitan Bakery, topped with a slice of mozzarella from Claudio's and a basil leaf from the farmstand, these tomatoes make a delectable appetizer — the most adored tastes of summer concentrated in one bite.

Oven-Dried Tomato Bruschetta
Serves 6 as an appetizer

12 plum tomatoes
kosher salt

1 baguette
olive oil
fresh mozzarella, cut into ½-inch thick slices
fresh basil

Preheat oven to 200ºF.
Halve each tomato lengthwise through the stem. Arrange the tomatoes, cut side up, side by side on a rimmed cookie sheet. (Tomatoes should not be touching one another.) Sprinkle each tomato lightly with salt.

Place in the oven and bake for six to eight hours, or until tomatoes are shriveled, but not dry and brittle. Check every couple of hours. (The tomatoes should still feel flexible when removed from the oven.) Remove tomatoes from the oven, and let cool completely before storing. Store in a glass jar or Ziploc. Moisten with olive oil if tomatoes are too dry. The tomatoes will keep indefinitely.

For the bruschetta, preheat the oven to 400ºF. Slice the baguette into ¾-inch thick rounds, drizzle with olive oil and bake until golden, about 10 minutes. Remove from the oven and let cool. Top each baguette slice with a piece of mozzarella, a few oven dried tomatoes and a few small leaves of basil. Serve.

Thursday, September 6, 2007

Watermelon Gazpacho & Watermelon Salad

Last month for two weeks in a row, I received watermelons in my CSA. Though they were small, I hesitated from cracking into them, fearing I wouldn't finish them on my own. So I let them sit for a few days until I received a fortuitous email from the Fair Food Farmstand. Emily Teel, the manager, sends an email each week listing the products the stand has in stock along with some seasonal recipes. When I saw the recipe for watermelon gazpacho, I set to work in the kitchen. Before too long, I had found a wonderful use for my two sugar baby watermelons, and produced a most delectable soup that I enjoyed, with the help of my sister, for the next few days.

While my sister and I slurped this minty, refreshing soup straight from the Tupperware containers I had packed it in, this gazpacho really deserves a more honorable presentation: The combination of colorful vegetables of all shapes and textures floating in a magenta base is truly striking. Served with a wedge of avocado and a sprig of mint in delicate bowls, this simple chilled soup makes an elegant summer meal.

Also, check out my latest entry on Uwishunu about Nam Phuong, a great Vietnamese restaurant at 11th and Washington.

When I first saw feta paired with watermelon, I thought the combination seemed odd, and truthfully, not that appetizing. My mother and I have been trying to remember where we first saw the duo — possibly a Jean Georges or Todd English cookbook, but we're not quite sure. In any case, sweet and salty ingredients, hardly a novel concept, often work nicely together, watermelon and feta being one example. Only a few more weeks of watermelon season remain, so enjoy them while you can!

Watermelon Gazpacho
From Emily Teel, manager of the Fair Food Farmstand

3 pounds of watermelon flesh, diced (about 5 cups), divided
1 small cucumber, peeled, seeded, diced (about 1 cup)
1 red bell pepper, seeded, diced (about 1 cup)
1 pint yellow cherry or sungold tomatoes, quartered (about 1 cup)
1 small jalapeño chile, seeded, minced
3 pale green inner celery stalks, diced (about ½ cup)
½ small red onion, diced (about 1 cup)
3 tablespoons fresh lime juice
2 tablespoons red wine vinegar
¼ teaspoon salt
5-8 mint leaves, finely chopped
avocado for garnish

Puree 4 cups watermelon in blender until smooth. Transfer puree to large bowl. Add remaining 1 cup diced watermelon and next 10 ingredients; stir to combine. Cover gazpacho and refrigerate until cold, at least 1 hour and up to 4 hours.

Divide gazpacho among bowls. Top each with a slice of avocado.

Watermelon and Feta Salad
Serves 1

4 slices watermelon
2 ounces feta cheese
2 slices Prosciutto di Parma
extra-virgin olive oil
aged balsamic vinegar or reduced balsamic (see recipe below)
kosher salt and pepper to taste

Place watermelon wedges on a plate. Crumble feta cheese over the watermelon. Lay the prosciutto aside the watermelon. Drizzle entire plate with olive oil, balsamic, salt and pepper to taste.

Reduced Balsamic
Yield = ¼ cup

½ cup Rainwater Madeira
1 cup commercial balsamic vinegar
1 tablespoon brown sugar

Place Madeira in a small saucepan and simmer over medium heat until reduced to about 1 tablespoon. Add the balsamic vinegar and boil until the vinegar has reduced to about ¼ cup and is very syrupy and big shiny bubbles are forming at the surface. Watch the mixture very closely at this point—it will burn easily. Remove from the heat and stir in the brown sugar until dissolved. Pour into a clean jar and cool before using.

Tuesday, September 4, 2007

Peaches with Ricotta and Honey

See, I lied. I thought I had finished posting about peaches this season, but it seems I've found one more way to savor this delectable fruit.

This dish couldn't be simpler to prepare: Slice a peach, top it with a few spoonfuls of fresh ricotta cheese and drizzle the whole mixture with honey to taste. This combination makes a nice dessert, but can be enjoyed really at any time of day: breakfast, lunch, a hearty snack?

This tasty treat is particularly delicious when prepared with juicy white peaches, sweet lavender honey and Claudio's fresh ricotta.