Thursday, March 27, 2008

Whole Grains & Food Synergy

I caved. I couldn't hold out any longer. Over the weekend, I went to the store and bought my first bag of flour, can of baking powder, box of baking soda and bottle of vegetable oil since arriving on the West Coast. I still don't have any cooking equipment, so I bought a muffin tin and a 9-inch cake pan, too. I had been wanting to make these cranberry-orange pecan muffins I had spotted in this cookbook I recently acquired, The Complete Whole Grains Cookbook, and I had been enlisted to make dessert for Easter dinner. (FYI, I made Balzano apple cake ... so good ... a must-try recipe )

Baking is so fun! I've forgotten, and I feel like I might go on a little whole-grain muffin bender. But not till I finish the half-dozen muffins that are left in my freezer. I made this batch on Saturday, ate a few after they came out of the oven, then wrapped each one individually in foil and threw them in the freezer. Every morning now, I heat one in the oven at 350ºF for about 10 minutes. It's such a treat to split one of these open, spread it with a little butter and tuck in.

Now, I must confess, I returned from the store without having purchased all the ingredients I needed to make these muffins. I couldn't find barley flour, I forgot to purchase orange juice and I opted to buy dried cranberries instead of frozen. The muffins still came out well — I used milk instead of OJ and 1½ cups whole-wheat flour instead of the barley flour — but I think freshly squeezed orange juice, as the recipe suggests, will make them even better.

I plan on remaking these cranberry-orange muffins once I find barley flour, but in the meantime I have a growing stack of whole-grain muffin recipes I am anxious to try. I just took a look at my Martha Stewart (the April issue) and found three: blueberry-banana cornmeal, oat bran-applesauce, and carrot-zucchini yogurt. Yum. Well, we'll see. The last one is sounding awfully similar to those zucchini-blueberry muffins I adore (and Ben hates) from Captain Mauri's.

Now, eating things like muffins, I know, is probably not the best way for us to get our fill of whole grains. (Particularly if they resemble anything like the ones from Captain Mauri's. Each one weighs like five pounds.) A better way to get a serving of whole grains is to eat a bowl of soup like the one featured below, also a recipe from this new cookbook.

Which brings me to the real reason why I am talking about whole grains in the first place. In the introduction to this cookbook, the author, Judith Finlayson, talks about all the health benefits of eating whole grains but also touches on an idea scientists are just beginning to explore: food synergy. Finlayson notes that emerging research suggests “the phytonutrients found in plant foods fight disease more effectively when they work together, rather than as supplements on their own.”

Michael Pollan, too, in his latest book, In Defense of Food, discusses this same idea, pointing to a study conducted by epidemiologists at the University of Minnesota. These doctors found that a diet rich in whole grains reduced mortality from all causes. But even after they adjusted for levels of dietary fiber, vitamin E, folic acid, phytic acid, iron, zinc, magnesium and manganese — all nutrients found in whole grains — the scientists discovered “an additional health benefit to eating whole grains that none of the nutrients alone could explain.” The subjects who received the same amount of nutrients from other sources were not as healthy as those eating whole grains, suggesting “that something else in the whole grain protects against death,” and that “the various grains and their parts act synergistically.”

Pollan concludes: "A whole food might be more than the sum of its nutrient parts." I think he might be on to something.

Anyway, no military-life article this week in The Bulletin, but if you care to read more about whole grains the article will appear in The Bulletin's Life Lines section today.

Also, just a note, this whole grains cookbook got sent to The Bulletin's office in Philadelphia before I left for CA. I only recently got around to looking at it, and I think it is in an excellent resource. If you are looking to introduce whole grains into your diet more regularly, this book might be a nice addition to your cookbook library. Order a copy from Amazon here: The Complete Whole Grains Cookbook

Note: I've printed this recipe just as it appears in the book, though I did not follow the recipe exactly. I used chicken stock, more than suggested. I used barley. I added salt until it tasted good. Next time, I might omit the puréeing-of-the-beans step and either cook dried beans from scratch or add the beans at the end, so they don't get mushy. I loved the recipe, however, and now have lots on hand in the freezer.

Wheat Berry Minestrone with Leafy Greens

Adapted from the Complete Whole Grains Cookbook (Robert Rose, 2008)
Serves 6

2 cups white kidney beans or 1 14-oz. can beans, drained and rinsed
4 cups homemade vegetable stock or reduced-sodium chicken stock, divided
1 T. olive oil
2 onions, chopped
4 stalks celery, diced
4 cloves garlic, minced
2 tsp. dried Italian seasoning
¼ tsp. cayenne pepper
1 cup wheat, spelt or Kamut berries rinsed and drained (barley works well too)
1 14-oz. can diced tomatoes with juice (salt-free)
2 cups water (or chicken stock)
8 cups coarsely chopped, trimmed kale or Swiss chard (or mustard greens)
salt and freshly ground black pepper to taste
grated Parmigiano Reggiano to taste (optional)
extra virgin olive oil
warm baguette (optional)

1. In a food processor, combine beans with one cup of the stock and purée until smooth. Set aside.

2. In a large saucepan or Dutch oven, heat oil over medium heat for 30 seconds. Add onions and celery and cook, stirring until celery is softened, about five minutes. Add garlic, Italian seasoning and cayenne and cook, stirring for one minute. Add wheat berries, tomatoes with juice, water, reserved bean mixture and remaining three cups of the stock and bring to a boil.

3. Reduce heat to low. Cover and simmer until wheat berries are almost tender, about one hour. Stir in the kale. Cover and cook until kale and wheat berries are tender, about 15 minutes. Season to taste with salt and black pepper.

4. When ready to serve, ladle soup into bowls. Sprinkle liberally with Parmigiano, if using, and drizzle with olive oil. Serve with warm bread.

Rinds of Parmigiano Reggiano added to cooking soup impart a wonderful flavor:
Cranberry-Orange Pecan Muffins
Adapted from the Complete Whole Grains Cookbook (Robert Rose, 2008)
Yield = 12

1 cup whole wheat flour
½ cup whole barley flour (I couldn't find barley flour and so used 1½ cups whole wheat flour)
½ cup unbleached all-purpose flour
¾ cup sugar
¾ cup chopped pecans
2 tsp. baking powder
½ tsp. salt
¼ tsp. baking soda
1 egg
½ cup sour cream
2 tsp. finely grated orange zest
½ cup freshly squeezed orange juice
¼ cup vegetable oil
1½ cups cranberries (fresh or frozen*), coarsely chopped (I used dried and didn't chop them)

1. In a large bowl, combine whole wheat, barley and all-purpose flours, sugar, pecans, baking powder, salt and baking soda. Mix well and make a well in the center.

2. In a separate bowl, beat egg. Add sour cream, zest, juice and oil and beat well. Pour into the well and mix with dry ingredients, just until blended. Fold in cranberries. Divide batter evenly among prepared muffin cups. Bake in preheated oven until the top springs back when lightly touched when lightly touched, about 25 minutes. Let cool on a wire rack for five minutes before removing from pan.

* Notes: You can make the batter ahead of time and refrigerate overnight. If you’re making the batter ahead, don’t add the cranberries until you’re ready to bake. You can chop them, cover and refrigerate overnight. The batter will keep for two nights, so if you’re baking half, chop half the cranberries and do the remainder the following night. If using frozen cranberries, partially thaw them and blot in paper towel before adding to the batter.

Wednesday, March 26, 2008

Quesadilla Trouble

I realized today that I don't know how to make a quesadilla. This is what I did: I briefly warmed two soft, corn tortillas in a dry nonstick pan. Then, I took them both out of the pan and covered one with grated cheese and one half of an avocado thinly sliced. I put a little oil in the pan. I covered the cheese and avocado with the remaining tortilla, and placed the whole thing in the frying pan. I weighed down the tortillas with a nonstick pan and ate the remaining half of the avocado sprinkled with salt — best snack ever — while I waited for my quesadilla to finish cooking.

Now, it wasn't that my quesadilla didn't taste good, it was just that it tasted different. Maybe it was because I used corn tortillas (from Trader Joe's, which are delicious ... thanks for the tip Aunt Vicki) instead of flour? Maybe it was because the cheese I bought, a pre-grated mix called Quatro Frommagio, didn't melt very well? Maybe it was because I got impatient and took the quesadilla out of the pan as soon as I finished eating my avocado? I don't know, I can't figure it out. I have not supplied a recipe since you likely know how to make a quesadilla better than I.

Thursday, March 20, 2008

Grass-fed Flank Steak, Not Local, But Tasty

Last weekend I made my first visit to a Whole Foods Market since arriving on the West Coast. After a long visit at The Getty — my dad has serious endurance when it comes to art — we drove home along Pacific Coast Highway and stopped in Long Beach to pick up dinner. Exhausted from the day, my dad stayed in the car for a snooze.

Inside, I spotted a fairly large selection of grass-fed beef in the meat department. Though the man behind the counter did not know where the meat originated, I bought two slabs of flank steak. I have since learned it comes from Nebraska. I know, I'm a total hypocrite.

For dinner, we kept preparations very simple. Ben seasoned the meat with salt and pepper and threw it on the grill. As my dad worked his way through a wedge of Stilton, I prepared an arugula salad and sliced up some avocados. Dinner was ready in no time.

We all really loved the steak. Grass-fed meat is noticeably different than corn-fed. Its color, at all stages of doneness (rare, medium-rare, etc.), is a lighter shade of pink. Its smell, before cooked, is different too, earthy perhaps? And it tastes, well, grassier? It's hard to describe. Ben said the meat tasted like an egg, and I don't think that's just because he has been eating a lot of eggs these days. Anyway, the steak was delicious. Too bad it's not local.

And, for a change, Ben had some more desirable leftovers to bring to work this week. Piled in between two slices of whole wheat bread, slathered with mustard and mayo, and topped with arugula and cheddar cheese, flank steak makes a great sandwich — a vast improvement over the mixture of chard and brown rice Ben often zaps in the microwave for lunch.

Also, I'm having some technical difficulties with Google docs right now, but The Bulletin can be read here: Feeding A Marine

Grilled Flank Steak & Leftover Sandwiches
Serves 3 for dinner, with meat for leftover sandwiches

2 smallish-sized slabs grass-fed flank steak
kosher salt freshly ground black pepper


For the sandwiches:
arugula
whole wheat bread
Dijon mustard
mayonnaise
cheddar cheese
black pepper


For dinner:
1. Preheat the grill to high. Season meat on both sides with salt and pepper. Grill three to four minutes a side, depending on thickness. Let rest five minutes before slicing thinly against the grain.

For lunch:
2. If you are reading this blog, you likely know how to make a sandwich.

Sunday, March 16, 2008

Farm Fresh Eggs & A Weeknight Staple

So, as you’ve likely gathered from recent entries, I’m having a little trouble at the grocery store, mostly in front of the meat counter. I never thought I would reach this stage, but last week at Albertsons, I stared at a package of lamb chops for five minutes before walking away empty-handed. I couldn’t purchase the lamb without knowing how it had been raised. And these days, I assume the worst.

Protein options in the Stafford household, as a result, have been reduced to grass-fed ground beef from Trader Joe's, fish from the Sunday farmers’ market, organic chicken (which I’m not even that psyched about since the chickens probably lived in less-than-desirable quarters) and eggs from Don’s Farm Stand at the San Clemente farmers’ market.

Now, of the five or six different meals I currently have us rotating on, I most look forward to eating those featuring Don’s eggs. Prepared in any style — scrambled, fried, poached — these eggs taste delicious. Ben swore I had added something special — cheese? cream? — to his scrambled eggs Sunday morning. Don's eggs, I assured him, need nothing more than salt, pepper and a splash of Tabasco.

I have no doubt that these eggs look — the yolks, as the picture below shows, are a rich, orange color — and taste the way they do because Don treats his chickens so well. Last Sunday, I asked Don what kind of laying hens he raises, and he pulled out a picture he keeps in his cash register. He has some Sextons, but most of his hens are a cross between a Rhode Island Red and a white breed, (the name of which I have forgotten).

His chickens roam around in a spacious area enclosed by wire fencing on his farm in Wildomar. Don feeds them all sorts of things: a high-protein feed he purchases; any apples or produce from the market other vendors cannot sell; and any leftover greens he cannot sell. His chickens, he says, love greens.

I feel so fortunate to have access to a fresh dozen of eggs every Sunday. Before I added eggs to our weekly dinners, I think Ben felt a little starved for protein. I guess I should say, I know Ben felt a little starved for protein. What gave it away? It might have been the Burger King bag he arrived home with one evening just before dinner.

My favorite way to prepare these eggs for the time being is poaching. And when I have leftover rice on hand, never am I happier. I microwave the rice, sauté some greens and poach three or four eggs — dinner can be made in no time.

Poached Eggs Over Rice
Serves 2, with leftover rice

Note: This recipe gives instructions to make brown rice pilaf, but any kind of rice — steamed jasmine or basmati, Uncle Ben’s long-grain converted, or minute rice — makes a wonderful base for a poached egg. Polenta works as well. Serve some sautéed greens aside this poached egg-rice combination for a simple dinner.

1 tablespoon olive oil
1 teaspoon butter
½ to 1 yellow onion,
peeled and diced
kosher salt
freshly cracked black pepper
1 cup brown rice
(see note above)
1 bay leaf

2 to 4 eggs (1 to 2 per person)
vinegar such as white, white wine, apple cider
Tabasco, optional

1. Place the olive oil, butter and onion in a large, nonstick frying pan, and place over medium heat. Season with salt and pepper to taste. Let sweat for five to 10 minutes or until the onions are translucent and tender. Add the cup of rice, and stir until the rice is evenly coated in the oil-butter-onion mixture. Turn the heat to high, and add two cups of water and the bay leaf. Season with another pinch of salt and pepper to taste. Bring to a boil, cover the pan (aluminum foil works too), and reduce the heat to low. Cook for 45 minutes. Turn off the heat, and let sit, covered, for 10 minutes.

2. Meanwhile bring a small, shallow saucepan filled with water to a boil. Add a capful of vinegar. Crack eggs, one at a time, into a ramekin or small vessel. Reduce the heat of the pot to just a simmer — seriously, the water should hardly be moving. Gently drop the egg into the water. Turn up the heat to achieve that very subtle simmer, then add another egg in the same manner to the pan. As the eggs cook, fluff the rice with a fork or spoon. Place a mound of rice on each plate. The eggs should cook for only two or three minutes. Top each mound of rice with one or two eggs. Serve with sautéed greens.

3. Pass salt, pepper and Tabasco on the side.


A sign hanging at Don's Farm stand at the San Clemente farmers' market. These eggs are so good. Crack one open, you'll see. And when you scramble up two or three, you'll taste the difference too. Farm fresh eggs. Yum!

Friday, March 14, 2008

Grilled Cheese, The Mission & A Petting Zoo

Yesterday, around 12:30, I found myself in San Juan Capistrano with an hour to spare. I considered all my options: feeding the goats at the Petting Zoo; dining at The Ramos House Café; or visiting The Mission. As I approached the railroad tracks, however, I spotted a new café, Blendz, and walked in to check it out.

Now, I have to admit, I’m sort of going through an anti-fine dining phase. I’m not into the smoked sundried tomato pestos and lemon-basil aiolis right now. Sometimes I just want a sandwich. Anyway, Blendz offers salads, smoothies, paninis, and apart from its "intoxicating champagne dressing" basically keeps things pretty simple. I ordered the kids grilled cheese, made with a combination of Monterey Jack and cheddar, and was very pleased — no tapenades; no pestos; no vegetables. Just plain grilled cheese pressed on a panini machine. Yum.

Let’s see. Not much else too report. Here’s the second article in The Bulletin series: Ten Days

This is just one of many beautiful citrus trees inside the Mission San Juan Capistrano. Tomorrow, the Mission is celebrating the return of the swallows. Come visit!

Monday, March 10, 2008

My Cheese Book Arrived, And I Made Cheese!

I can hardly contain my excitement about my new book. Soon after it arrived on Friday, I drove to Henry’s Market in Laguna Niguel to buy a gallon of raw milk (Aunt Vicki, don’t be mad … and don’t tell Jerry) and some other basic supplies: cheesecloth, a colander and a thermometer. I returned home and set to work. Within two and a half hours, I had made a small batch of lemon cheese. It was amazing!

I’m referring to the process, that is. The cheese, taste- and texture-wise, needed serious doctoring — salt and herbs, as recommended in the book, and also a few tablespoons of milk (a spontaneous decision) to help bind it together. The addition of milk gave the cheese a creamier texture, sort of like goat cheese but without the chalkiness and that distinct goat-milk flavor. I’m not sure it was the right move, however. My dad said the cheese tasted “milky,” and then devoted his attention to the wedge of gouda we had picked up earlier in the day at the Del Mar farmers’ market. View all the photos from my experiment here.
While my first cheesemaking attempt may have flopped, I’m still determined to try several other recipes in this book. And I'm going to try them despite having lost all hope that cheesemaking, as the title promises, can be made easy. Let me explain. The authors, Ricki and Robert Carroll, begin by wondering why “the art of breadmaking fled the factories and resettled in our homes so far ahead of the art of cheesemaking.” Then, they list all the tools the home cook needs to make cheese including a dairy thermometer, a curd knife, cheesecloth, butter muslin, molds, and a cheese press. A cheese press! (Pictured at the right is a Wheeler press, an English model. These can cost between $200 and $300. They don't look like they fit easily into cupboads either). Then, the Carrolls describe the preparation process — sterilizing equipment, pasteurizing milk (they recommend not using raw milk) and making starter cultures. All of this before the cheesemaking process even begins!

I’m totally game to do all this, and I’m sure the process becomes easier/faster after several attempts, but I'm still unsure as to why the Carrolls don't understand why home cooks picked up breadmaking before cheesemaking. Breadmaking requires yeast, flour and water only. No special equipment; no sterilization; no pasteurization. Alas, maybe one day I'll understand.

As I mentioned Friday, I’m slowly figuring out my employment situation. I’m now writing a weekly column for The Bulletin, the newspaper I worked for this past year in Philadelphia. It’s about life in the military, or I guess I should say, it's about life for a couple new to the military. (In other words, it's about Ben and me.) I’ll post a link each Friday to the article. Here is the first in the series: Focus Points.

Also, as the link I posted on Friday for the rapini article failed to produce the recipe, it can be found here: Rapini To Relish.

Thursday, March 6, 2008

Tat Soi & The Sun Post News

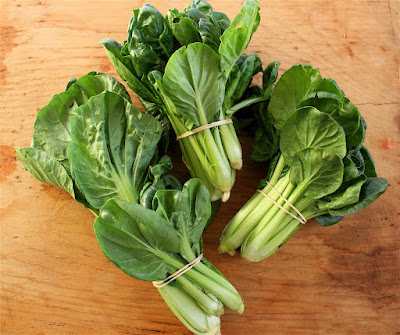
Last Sunday, I walked home from the San Clemente farmers’ market feeling a bit like a hog. I had spotted six little bundles of tat soi — what I thought was bok choi — sitting atop the arugula at the Peterson Specialty Produce stand, and I purchased them all.

But what’s a girl to do? I love baby bok choi and have yet to see it at the farmers’ markets here. Sautéed with garlic and red pepper flakes, this Asian green makes a wonderful side dish. My love for this tasty (and adorable) vegetable began at Twenty Manning, in Philadelphia, with their steamed baby bok choi side dish.

Anyway, tat soi, I’ve discovered, looks and tastes very similar to bok choi. I can’t tell you how the two differ, only that a difference certainly exists: “Tat soi, not bok choi,” Andrea Peterson, the woman who grows these delectable mini cabbages, told me over the phone last Sunday afternoon, after I told her I had bought some bok choi earlier that morning.

I had called Andrea to learn more about her farm, Blue Heron Farm, and the variety of greens I have been purchasing from her each week: rapini, arugula, baby lettuces, and now, tat soi. So intrigued by what I learned — she also grows bananas and mangos on her Fallbrook farm — I wrote up a little story. It appeared today in San Clemente’s Sun Post News. Ahhh, slowly but surely I’m finding employment. (I'm not sure the article has been uploaded to the Web site, however, so the article can be read here: Rapini To Relish.)

Sautéed Tat Soi
Serves 2 as a side dish

5 bundles tat soi (there are three tat soi per bundle)
1½ tablespoons olive oil
2 cloved garlic,
minced
crushed red pepper flakes to taste
kosher salt to taste

1. Bring a large pot of water to a boil.

2. Unwrap the bundles of tat soi and place in a large bowl filled with cold water. This will allow any dirt to fall to the bottom of the bowl.

3. Meanwhile, place the olive oil and garlic in a large nonstick sauté pan. Turn the heat to medium. When the garlic begins to sizzle, turn the heat to low and let cook, watching closely to be sure the garlic does not brown. After 2 or 3 minutes add crushed red pepper flakes to taste and turn off the heat.

4. When the water boils, add the tat soi. Let cook for 10 to 30 seconds max. Drain and rinse under cold water.

5. Turn the heat under the frying pan to medium high. When the garlic and pepper flakes begin to sizzle, add the tat soi. Season with kosher salt to taste. Shake the pan or turn the tat soi with tongs to coat it in the olive oil-garlic mixture. Serve immediately.

Pictured below is the rapini-linguini I made following Andrea Peterson's instructions. She learned this simple recipe from two Italian customers who brought her rapini seeds (from Italy) for her to grow. For the recipe and to read more about Blue Heron Farm, click here. The recipe ... shocker ... features none other than Delaney's Culinary Fresh red pepper linguini.

Monday, March 3, 2008

Blood Oranges and Ettinger Avocados

OK, I know, my consumption of oranges and avocados is getting out of hand. What’s pictured below is just my mid-morning snack. Ben drew the line last night before dinner. He told me he was starting to get “freaked out.”

To be fair, let me put his comment in context. For the most part, we have been eating the widely recognized Hass avocados — the dark, rough-skinned variety. Last night, however, I changed things up a bit and pulled out the Ettinger avocado I had purchased at the Sunday farmers' market. A woman working at the Eli’s Ranch table told me Ettinger avocados have a “buttery texture” and “a pine nut flavor.” They also look like ostrich eggs, which I believe is what freaked Ben out.

I told Ben to look away as I sliced into its flesh. I didn’t want him to lose his appetite. Once on the plate, sprinkled with a little salt, however, these avocados look just like all the others, and Ben could eat his meal in peace.

Blood Oranges. Since reading a post in Matt Bites about a blood orange and campari cocktail I have been wanting to a.) make the drink and b.) experiment more with blood oranges. I have yet to make the cocktail but I have been eating my fair share of blood oranges. Mixed with avocados, sprinkled with sea salt and drizzled with olive oil, they make a yummy, simple salad or, as I mentioned above, a nice mid-morning snack.

Last night, I made a vinaigrette using the juice of two blood oranges, shallots, olive oil and salt (using the same method described on the sidebar below) and tossed it with arugula and shaved parmesan. Yum.

That’s all for now. I will try to refrain from mentioning oranges and avocados in the near future.

A Simple, Yummy Snack
Serves 1

1 avocado
sea salt
2 blood oranges
good extra-virgin olive oil


1. Cut the avocado in half. Remove the pit. Scoop out the flesh. Cut into large chunks. Place on a plate. Sprinkle with sea salt.

2. Slice off the ends of each orange. Using a sharp knife, slice off the peel, removing as much of the pith as possible. Cut the orange into large chunks and add to the plate of avocados. Season with a touch more salt.

3. Drizzle with olive oil. Eat.

A crate filled with Ettinger avocados. OK, so they don't really look like ostrich eggs, but they are significantly larger than Hass.