So, it finally feels like fall outside, which is great, although my apartment feels like an icebox. Phil, my lanlord, won't turn on the heat for weeks, so I guess I better get used it. My neighbor upstairs has been roasting a turkey all day just to heat up his apartment. Fortunately, I won't have to take such extreme measures — I have quarts of this spicy, pumpkin soup on hand. Although this soup hardly resembles the pumpkin soup I first became addicted to — ABP's, served in a bread bowl — pumpkin soup in any form always reminds me of college and of fun trips out to eat with roommates and teammates when the dining hall's fare just wouldn't cut it. I love pumpkin soup.
This recipe has been adapted from one I saw recently on Heidi Swanson's 101 Cookbooks.com. Almost any winter squash can replace the pumpkin, and when I make this soup again, I will use a red kuri squash or a hubbard squash, the varieties that a woman at the Fair Food Farmstand recommended I use. (While I was shopping, I was determined to use only pumpkin for my pumpkin soup.) I did, however, roast a red kuri squash next to the pumpkins to compare flavors, and ultimately found the red kuri squash to be tastier than the pumpkins. But for a recipe like this, with lots of added seasonings — Thai red curry paste, coconut milk, ginger — a more mild-tasting squash such as a pumpkin works fine.
Next pumpkin recipe: Pumpkin Ravioli with Crispy Sage and Brown Butter Sauce ... so yummy!
Thai-Spiced Pumpkin Soup
Yield = 2½ quarts
2 sugar pumpkins*, about 2 lbs. each
olive oil
kosher salt
1 tablespoon butter
1 medium onion, roughly chopped diced
1-inch knob ginger, peeled and roughly chopped
2 cloves garlic
2 tablespoons Thai red curry paste
1 can unsweetened coconut milk, (13.5 oz.)
cilantro, optional
spiced pumpkin seeds, optional
*Winter squash such as Hubbard, red kuri or butternut make fine substitutes for the pumpkin. Two sugar pumpkins yield about four cups of flesh.
Preheat the oven to 400ºF. Cut each pumpkin in half, scoop out the seeds and discard. Drizzle about a teaspoon of olive oil on a baking sheet. Season inside of pumpkins with salt and place cut side down. Roast for about 45 minutes or until a knife inserts easily through the skin into the flesh. Remove from the oven and let cool completely.
Meanwhile in a medium-sized saucepan, melt the butter. Add the onion and ginger and cook over medium heat until translucent and tender, about five to 10 minutes. Season with salt to taste. Add the garlic and sauté for a minute longer. Add four cups water, one tablespoon of the curry paste, the coconut milk and one teaspoon of salt, and bring to a boil.
When the pumpkin has cooled, scoop out the flesh and add to the pot (there should be about four cups of flesh). Return mixture to a boil and let simmer 10 minutes. Using an emersion blender, purée the mixture until smooth. (Alternatively, transfer to a blender or food processor and blend until smooth.) Taste mixture, adding more salt if necessary and the remaining tablespoon of curry paste if desired. Return to stove to heat through if serving immediately, or let cool completely before storing. Serve with chopped cilantro and spiced pumpkin seeds.
Sweet & Salty Pumpkin Seeds
Yield = 1 cup
¼ cup sugar
½ teaspoon kosher salt
2 teaspoons canola oil
1 cup pumpkin seeds
Combine sugar and salt in a large bowl. Set aside. Pour oil into a nonstick sauté pan and turn heat to high. Add nuts. Sauté until nuts begin to pop violently. After three to four minutes, when half of the nuts have turned golden brown, turn off the heat, transfer nuts to the bowl with the sugar-salt mix, and toss to coat. Transfer nuts to a fine mesh strainer and shake excess any coating off. Line a sheet pan with foil and spread nuts across it to cool completely. Store in an air-tight container.
Monday, October 29, 2007
Saturday, October 27, 2007
Pumpkin Cupcakes
Oh man, Old School is too funny. So it's Saturday night, I started watching the Red Sox game, but tired quickly — sorry Nick (and all those other die-hard fans out there) for my lack of spirit, but seriously, it's already 6-0. Anyway, after flipping through the channels, I came across Old School, a movie I still have not seen start to finish but that I feel I've seen 100 times because my lacrosse team quoted it incessantly when it came out in 2003. Anyway, I've been laughing out loud ... my poor grandmother ... I'm probably waking her up.
What else, let's see, I just had the most delicious moussaka for dinner, followed by Balzano apple cake for dessert, two treats left for my grandmother by my auntie. I must learn that moussaka recipe — it is unbelievable!
Oh and these cupcakes, the third in a series of pumpkin recipes, are really a seasonal treat — they'll please everyone: On Monday, fearing if I left them in my reach they would disappear as quickly as last week's apple cake, I dropped the remaining 11 of this batch of 12 off at The Bulletin's office, and they were a big hit. Unfortunately, I still have about a quart of the cream cheese frosting left in my refrigerator at home ... I really hope I don't return to Philadelphia with an empty stomach.
Next pumpkin recipe: Thai Pumpkin Soup with Sweet and Salty Pumpkin Seeds
Pumpkin Cupcakes with Cream Cheese Frosting
Yield = 12 cupcakes
1½ cups flour
1 teaspoon baking powder
1 cup pumpkin purée
1/3 cup vegetable oil
2 large eggs
2 teaspoons pumpkin pie spice
1¼ cups sugar
½ teaspoon baking soda
½ teaspoon kosher salt
frosting and decorative garnishes (purchased at Fante’s) if desired
Preheat the oven to 350ºF. Whisk together the flour and baking powder. In a separate bowl, whisk the remaining ingredients. Combine the wet and dry ingredients and mix only until just combined. Place paper liners in muffin pan or coat with cooking spray. Fill each cup only three-quarters full. Bake 20 to 25 minutes or until an inserted knife comes out clean. Let cool completely before frosting.
Cream Cheese Frosting
8 oz. cream cheese, room temperature
8 oz. butter, room temperature
1 teaspoon vanilla extract
2 cups confectioners’ sugar
Beat all with an electric mixture until smooth. Chill until ready to serve.
Friday, October 26, 2007
Pumpkin Waffles, Bread Pudding
Canned For The Sweets ... Fresh For The Savories
The Bulletin October 26, 2007
There’s nothing like gourd season to separate the purists and the pretenders in the kitchen. As I grew up indoctrinated with my mother’s culinary canons — chicken stock is made at home from real chickens, herbs and vegetables; salad dressing does not come from a bottle; homemade bread is simple to prepare; pie crusts are made only with butter; and the best burgers are made with freshly ground meat — I always considered myself a purist.
On Tuesday, however, I made the mistake of telling Sam Consylman, one of the farmers at the South and Passyunk Farmers’ Market, I had just made some pumpkin bread. “What kind of pumpkin did you use?” Mr. Consylman asked me. I paused. I knew what he meant. And as I looked around, I felt a sudden pressure, a collective stare emanating from the farm-stand table spilling with butternut, acorn, delicata, hubbard, kabocha and red kuri squashes. I sheepishly confessed: “Libby’s.”
“Oh man,” was all Mr. Consylman could say, his face twisting in disbelief, bordering on disgust. As he shook his head, he extolled the light texture and pure squash flavor of a real pumpkin pie, and he implored me to travel to Lancaster to taste one. I promised him I would.
I hope before winter squash season ends, I will get out to Lancaster, and I hope at some time, I do get around to making my own pumpkin pie from scratch. And in the meantime, I guess I’ll have to revise a little axiom of my own: Canned pumpkin for the sweets, fresh for the savories.
In the next few days: Pumpkin Cupcakes with Cream Cheese Frosting, Thai Pumpkin Soup with Sweet and Salty Pumpkin Seeds, and Pumpkin Ravioli with Crispy Sage and Brown Butter Sauce.
Pumpkin Waffles
Serves 3 to 4
2 cups flour
3 tablespoons sugar
4 teaspoons baking powder
1 teaspoon kosher salt
1 tablespoon pumpkin pie spice
1½ cups buttermilk
1 cup pumpkin purée
4 eggs, separated
1 stick butter, melted
1 tablespoon vanilla
powdered sugar, maple syrup and butter for serving
Preheat a waffle iron to hot and preheat the oven to 200ºF. Whisk together the flour, two tablespoons of the sugar, baking powder, salt and spice together. In a separate bowl, whisk the buttermilk, pumpkin, yolks, butter and vanilla until smooth. Combine wet and dry ingredients and mix only until just blended. Beat egg whites with an electric mixer until soft peaks form. Slowly add the remaining tablespoon of sugar and beat until glossy peaks form. Stir one-third of these egg whites into the batter to lighten, then gently fold in the remaining whites. Ladle into heated waffle iron and cook until crisp and golden. Meanwhile, place a cooling rack on top of a cookie sheet. As the waffles come off the iron, place on the cooling rack and place pan in oven to keep warm until all the waffles finish cooking (the rack keeps the waffles from getting soggy on the bottom).
Pumpkin Bread Pudding
Serves 8
1 baguette or loaf of white bread, cut into one-inch cubes, preferably cut and left to stale overnight
¾ stick (6 tablespoons or 3 oz.) of unsalted butter, melted
3 eggs, lightly beaten
3 cups whole milk
½ teaspoon vanilla
½ teaspoon kosher salt
¾ cup pumpkin purée
1 cup brown sugar
2 teaspoons pumpkin pie spice
powdered sugar
Preheat the oven to 350ºF. Place cubed bread in a bowl and pour the melted butter over top. Toss to coat, then transfer to a baking dish such as a 9x12 glass baking dish or any other similarly shaped vessel.
In a separate bowl, whisk eggs, milk, vanilla, salt, pumpkin, sugar and spice together. Strain mixture then pour over the bread in the baking dish. Bake for 55 minutes to an hour. When pressed gently, mixture will feel slightly jiggly but set.
Let cool 15 minutes before spooning into bowls and sprinkling each with powdered sugar.
Sunday, October 21, 2007
Figs & Fennel
Several weeks ago, just before my friend Meredith (fourth year medical student, see previous entry) departed for a grueling one-month surgical rotation in Pittsburg, Ben and I had the pleasure of dining with her and her fiancé, Matt (private chef on the Main Line). We again chose Sovalo — Matt and Mere's favorite spot — and again delighted in a wonderful dinner.
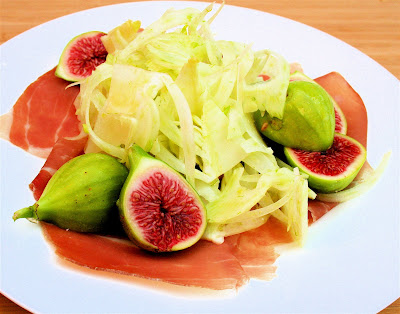
Some of the more memorable dishes of the evening include a homemade ravioli stuffed with figs, a tortelli tossed with duck confit and mushrooms, and a crispy pan-seared red snapper. The shaved fennel and Parmigiano Reggiano salad, however, tossed lightly in a lemon vinaigrette and served with prosciutto di Parma and fresh figs, was perhaps the favorite selection of the evening.
The combination of fennel and Parmigiano never fails to please but the addition of prosciutto and figs made every bite in this appetizer truly delectable. While I haven't made a trip to the Fair Food Farmstand in a couple weeks (so sad! CSA season has ended), I doubt they still have this variety of figs, though they carried them through the first week of October at least. With a tender green skin and a brilliant magenta-colored and sweet-tasting interior, these figs make any salad restaurant worthy. Black mission figs, however, the variety served at Sovalo, will more than suffice.
We concluded the evening with two desserts, one of which we particularly enjoyed/attacked: a biscotti tirimisu layered with fruit and I believe some sort of custard, but that part of the evening, to be honest, is a touch fuzzy ... cockails at the bar before dinner, wine during, Frangelico and coffee for some (me) after, and Port for all, suddenly add up — afterall it was a bon voyage dinner for our poor Pittsburg-bound Mere-Mere. Only two more weeks Mere!
Fig and Fennel Salad
Serves 4
2 fennel bulbs
olive oil
1 lemon, juiced
kosher salt and pepper
Parmigiano Reggiano
8 thin slices of prosciutto di Parma
12 fresh figs, halved
Using a mandoline or knife, slice the fennel as thinly as possible. Place in a bowl, drizzle with olive oil and the lemon juice, and season with salt and pepper to taste. Toss to coat evenly. Add a few shavings of cheese and toss lightly. Set aside.
Lay 2 slices of prosciutto on each plate. Top with a mound of the fennel-parmigiano mixture, and scatter six fig halves around the fennel. Serve.
Some of the more memorable dishes of the evening include a homemade ravioli stuffed with figs, a tortelli tossed with duck confit and mushrooms, and a crispy pan-seared red snapper. The shaved fennel and Parmigiano Reggiano salad, however, tossed lightly in a lemon vinaigrette and served with prosciutto di Parma and fresh figs, was perhaps the favorite selection of the evening.
The combination of fennel and Parmigiano never fails to please but the addition of prosciutto and figs made every bite in this appetizer truly delectable. While I haven't made a trip to the Fair Food Farmstand in a couple weeks (so sad! CSA season has ended), I doubt they still have this variety of figs, though they carried them through the first week of October at least. With a tender green skin and a brilliant magenta-colored and sweet-tasting interior, these figs make any salad restaurant worthy. Black mission figs, however, the variety served at Sovalo, will more than suffice.
We concluded the evening with two desserts, one of which we particularly enjoyed/attacked: a biscotti tirimisu layered with fruit and I believe some sort of custard, but that part of the evening, to be honest, is a touch fuzzy ... cockails at the bar before dinner, wine during, Frangelico and coffee for some (me) after, and Port for all, suddenly add up — afterall it was a bon voyage dinner for our poor Pittsburg-bound Mere-Mere. Only two more weeks Mere!
Fig and Fennel Salad
Serves 4
2 fennel bulbs
olive oil
1 lemon, juiced
kosher salt and pepper
Parmigiano Reggiano
8 thin slices of prosciutto di Parma
12 fresh figs, halved
Using a mandoline or knife, slice the fennel as thinly as possible. Place in a bowl, drizzle with olive oil and the lemon juice, and season with salt and pepper to taste. Toss to coat evenly. Add a few shavings of cheese and toss lightly. Set aside.
Lay 2 slices of prosciutto on each plate. Top with a mound of the fennel-parmigiano mixture, and scatter six fig halves around the fennel. Serve.
Thursday, October 18, 2007
Best Dessert Ever
Seriously, this may be my favorite dessert ever. After cookies and cream ice cream, that is. No really, I have taken this don't-take-your-mother's-advice thing way too far. She, I mean my mother — (Liza hates to be referred to as a pronoun) — has been telling me to make this cake for years, well at least since 2004, when the New York Times printed the recipe.
I baked this cake this morning, ate one quarter of it for lunch, and another quarter for dinner. I'm tempted to include a picture of the half-eaten cake in this post, but am too embarrassed. I don't know what else to say. It's moist, delicious, seasonal and can be enjoyed at breakfast, lunch or dinner. I mean it. Make it!
Balzano Apple Cake
Adapted from New York Times 2004
Serves 8
1 stick butter, plus more for greasing pan
parchment paper
2 eggs
1 cup sugar
1 vanilla bean
4 Fuji apples
½ cup flour
2 teaspoons baking powder
¼ teaspoon sea salt such as fleur de sel
½ cup milk at room temperature
powdered sugar
Heat oven to 350ºF. Grease a nine-inch-circle pan with butter. Cut a circle of parchment paper to fit the bottom of the pan and place inside pan.
Melt butter in small saucepan. Set aside. Beat together eggs and half of sugar in a bowl. Continue to beat while slowly adding remaining sugar until thick — it should form a ribbon when dropped from spoon.
Split vanilla bean in half lengthwise. Scrape seeds into the egg-sugar mixture and add pod to melted butter.
Peel apples and cut straight down around the core into four big chunks. Discard the core then slice the apple pieces thinly.
Remove vanilla pod from butter and discard. Stir butter into sugar-egg mixture. Combine flour, salt and baking powder, then stir into batter alternating with the milk. Stir in apples, coating every piece with batter. Pour batter into pan.
Bake for 25 minutes, then rotate the pan. Bake for 25 to 30 minutes more, until cake pulls away from pan and is brown on top. (A thin-bladed knife inserted into the center will come out clean when it is done.) Cool 30 minutes, then cut into wedges sprinkling each with powdered sugar if desired.
And what's going on? ... The Flyers just beat the Devils 4-0, and yesterday morning, my alarm sounded off to the voice of Johnny Stevens. My how things have changed.
Saturday, October 13, 2007
Mandy's Spaghetti Sauce
For the past few weeks, I've neglected to bring my husband any of his favorite treats when I visit him. No brownies, no cookies, no granola, no power bars, no quick bread — no sweets at all, in fact, for my favorite Marine (who just graduated from The Basic School ... yay!). And I hate to admit it, but if ever there were a time when he needed that extra brownie, it's now.
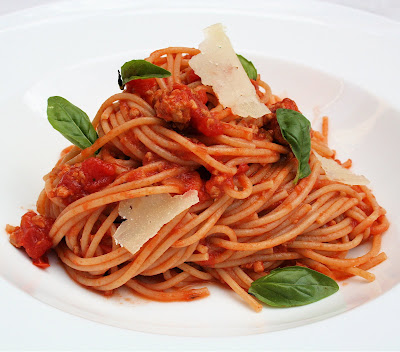
Thanks to my sister-in-law, Mandy, however, a weight-lifting, football-watching, Gamecocks-cheering fireball from South Carolina, who gave me her spaghetti sauce recipe, I have been able to bring Ben Tupperwares filled with pasta and meat sauce. Mandy makes this recipe in bulk for a number of reasons: For one, with a six-month old running around — almost running around — she has little time to make dinner every night. Second, she doesn't love to cook (although she's a culinary whiz), so having this sauce on hand minimizes the time she spends in the kitchen. And lastly, she has to feed not only herself and baby every night, but also her professional-powerlifter husband, John. (John holds a world record in his weight class for a dead lift and squat combination score.)
This recipe yields two quarts of sauce and freezes beatifully. For one pound of pasta — spaghetti, macaroni, shells or any other pasta variety — one quart of sauce works perfectly. With tons of fresh basil and a few shavings of Parmigiano Reggiano or Pecorino Romano, this spaghetti makes a wonderful dinner. Thanks Mandy!
Mandy's Spaghetti Sauce
Yield = 2 quarts
2 teaspoons olive oil
2 lbs. ground beef
1 large onion, chopped
1 green bell pepper, chopped
1 clove garlic, chopped
2 (6-ounce) cans tomato paste
1 (8-ounce) can tomato sauce
1 (28-ounce) can chopped tomatoes
1 tablespoon Italian seasoning
1 tablespoon Worcestershire sauce
2 teaspoons sugar
1 teaspoon table salt
Heat the oil in a large heavy-bottomed pot. Add the meat and brown, stirring occasionally. Add the onion, green pepper, and garlic, and sauté until the onion is tender, about 5 minutes. Add the tomato paste, tomato sauce, chopped tomatoes, 1 cup water, and seasonings. Simmer for 30 minutes. Taste, add more salt or sugar if necessary, and serve over pasta immediately, or let cool until ready to serve.
Note: This sauce will keep for several days in the refrigerator or indefinitely in the freezer. For a simple healthy meal, cook whole-wheat spaghetti, add lots of chopped fresh basil and a few shavings of Parmigiano Reggiano or Pecorino Romano.
Thursday, October 11, 2007
Pawpaws
If you've never heard of a pawpaw, don't feel bad — I only learned about them a few weeks ago myself. Well sort of. I'd actually been hearing about them for months from Sam Consylman, one of the farmers at the Livengood Family Farm stand at the South and Passyunk Farmers' Market. And when pawpaw season finally arrived, Sam invited me and another loyal South- and Passyunk-market goer to go foraging for this rare fruit in the Susquehannock State Park.
So, on a sunny September morning, Christine and I trekked out to Lancaster to learn about pawpaws. We shook trees, dodged snakes, avoided groundhog holes and tucked into this unknown fruit, tasting almost like a cross between a mango and a banana. Learning and hunting for pawpaws — a fruit indigenous to this area — was memorable to say the least. If you're curious about pawpaws, view all of the photos here and read more about our adventure along the banks of the Susquehanna River here.
It turns out that pawpaw flesh, like bananas and apple sauce, takes well to baking. I made pawpaw cookies first, which were good but cake-like, and so, I experimented with a quick bread. I replaced the banana in my mother's delectable banana bread recipe with the same amount of pawpaw flesh. Success! Moist and fruity, the pawpaw quick bread tasted better and better with each passing day. Now, because pawpaw season is over, use bananas instead — it is a wonderful recipe, and the bread, when baked in small loaf pans, makes a nice gift.
Pawpaw Quick Bread
butter or spray oil for greasing
2 ½ cups flour
2 teaspoons baking soda
¼ teaspoon table salt
2 scant cups sugar
1 cup butter, softened
4 eggs
½ teaspoon vanilla
3 cups pawpaw pulp*
*An equal amount of mashed ripe bananas can be used in place of pawpaws
Preheat the oven to 350ºF. Grease a bundt pan or 2 standard-sized load pans (8 x 11) or 5 mini loaf pans. Set aside.
Whisk together flour, baking soda and salt. Set aside. Cream sugar and butter until light and fluffy. Add eggs one at a time, beating well after each addition. Add the vanilla. Add the pawpaw pulp, and beat to combine. Add the dry ingredients and mix only until the flour is incorporated — don’t overmix.
Pour batter into prepared pans and place in the oven. (If using mini pans, place them on a sheet pan first.) Bake for 40 to 45 minutes for mini pans or 45 to 60 minutes for the bundt and larger loaf pans. Cake should be brown and should start to leave the sides of the pan.
Let cool on rack for 15 minutes before removing from the pan.
Friday, October 5, 2007
Pica Peppers
It began with a dare. Challenged by a friend to make a sauce "too hot to handle," James Jean-Louis set to work. Before heading to the kitchen to toast and roast habaneros, however, he hit the books, researching peppers and their affects on the human body.
And the more he learned about peppers, the more interested in making hot sauce he became. Seeing little point in enduring the pain inflicted by a fiery sauce that lacks flavor, Jean-Louis experimented until he created something that offered as much taste as heat. In the end, Jean-Louis won the bet and pursued his new passion by making a variety of other sauces.
This saucier first tested his creations on his co-workers at Deutsche Bank. Jean-Louis kept a stash on his desk, and at lunchtime, those seeking to jazz up their rice and beans or beef and veggie stir-fries could help themselves to a splash of the cilantro sauce or a drizzle of the "dark roast." To say the least, the sauces were well received: Some colleagues described them as the Grey Poupon of hot sauce; others admitted to picking a sauce first and then the food to match it. Today, Jean-Louis keeps these bottles locked up — they had been mysteriously disappearing — but fortunately, the lock has deterred no one: The die-hards still stop by every day.
In response to high demand, Jean-Louis partnered with Marven Wamwright and created Pica Peppers.Though the Web site is still under construction, Pica Pepper sauces can be purchased by contacting Jean-Louis at james@picapeppers.com.
Yesterday, I topped a poached egg with the Pica Pepper "Picalese," a condiment inspired by a spicy Haitian slaw, picoese, Jean-Louis' mother used to make with shredded cabbage and carrots. Jean-Louis has improvised a bit, preparing his picalese with julienned habaneros and garlic. And boy, does a little go a long way! This sauce puts Dave's Insanity Hot Sauce to shame. That said, never have I experienced such intense heat coupled with such vibrant flavors. Anyone who prides themselves on temperature-tolerance must give the picalese a try ... and I can think of two people off-hand that won't refuse this challenge.
Four years ago, my friend Amy Koch, known for eating hot salsa out of the jar until she breaks a sweat, participated in a "hot-off" with friend Peter Shanley. The competition continued for hours. When both competitors began munching on raw jalapenos, bystanders feared not what it would take to end, but that it might not ever end. And ultimately, this extremist duel concluded with a draw: To the horror of all witnesses, before accepting a title as co-champions, both Koch and Shanley snorted lamb vindaloo.
Below are the four flavors I have in my possession, three of which I still need to try. From left to right: Original, Lemon Pepper, Cilantro, and Dark Roast
Lemon Pepper
Bright citrus flavors distinguish the Lemon Pepper variety from any traditional hot sauce. Jean-Louis combines freshly squeezed lemon juice, hand-picked habeneros and garlic to make this dynamic sauce, an accompaniament designed for shell fish such as oysters, mussels and clams, but widely enjoyed on chicken, steaks and hamburgers.
The Perfect Poached Egg
My grandmother says my husband makes the best poached eggs, so I'll describe his method: Fill a shallow saucepan with water and bring to a boil. Add a spoonfull of vinegar (a light-colored vinegar such as white or apple cider or rice). Reduce heat to very low so that only the tiniest bubbles dance on the surface of the water. Crack an egg into a ramekin. Using the handle of a wooden spoon, swirl water to create a mini whirlpool. Slowly slide the egg inside and let cook for about 2 minutes. Adjust heat if necessary to maintain the gentle bubble: If you add more than one egg, likely you'll need to increase the heat.With a slotted spoon, lift the egg from the water, jiggle spoon to test doneness of the yolk. If too soft, return to water. If just right, place on top of toasted bread and serve with salt and freshly cracked pepper, or one of Pica Peppers tasty hot sauces.
Though I still haven't tasted all of the sauces, I have finally broken each one of the seals. It was hard – the bottles are just too pretty. Much to my surprise, however, the bottles, fitted with an elegant cork stopper, retain their beauty even without their wrapping.
Wednesday, October 3, 2007
Rosemary-Butternut Squash Bisque & Challah
In the beginning of the growing season, I promised to document each CSA I received. To say the least, I have been negligent, especially recently. For this soup, I think I used the contents of three separate CSAs. I definitely roasted two butternut squash and two delicata squash, and I swear I roasted a pumpkin too, but I can't find any documentation of actually receiving a pumpkin — I've written down each week's content, and pumpkin is no where to be found on my lists. Am I going crazy?
Anyway, this soup couldn't be simpler to make, and the recipe really is just a guide. I set the oven to 400ºF or 450ºF, cut the squash in half, scooped out the seeds, placed the squash cut-side down, and roasted them until they were tender (maybe 45 minutes or an hour). Once cooled, I scooped out the flesh, combined it all in a bowl, froze 2 cups of the mix for a later use (maybe ravioli filling) and added the rest (about 2 quarts) to a pot. I filled the pot with chicken stock, added salt, pepper and chopped rosemary, and simmered it for 30 minutes. I used my emersion blender to purée the mix, and in no time I had made a delectable soup.
The recipe called for orange zest, which I didn't have and so didn't use, but I remember it being a nice flavor when my mother used to make this soup for us. The recipe also calls for cream — which I guess justifies the title, though I would hardly call this purée a bisque — which I also didn't use.
I happened to have some frozen challah on hand that I had made for a Rosh Hashanah article I was writing about Fork's baker, Lauren Derstine, and it turned out to be a nice dipping bread, though any bread will do. Little Lindis and Mr. T. are heating up a bowl of this soup as I write...they can be the judges.
Rosemary-Butternut Squash Soup
Yield = 2 quarts
2 medium butternut squash
olive oil
6 cups chicken broth, preferably homemade
1 tablespoon chopped fresh rosemary
2 teaspoons grated orange zest
kosher salt and pepper to taste
2 tablespoons heavy cream, optional
Preheat the oven to 375ºF. Cut the squash in half lengthwise, scoop out the seeds and discard. Drizzle a teaspoon of olive oil on the baking sheet. Place the halves cut side down, rub in the oil and place in the oven. Roast until knife tender, about 45 minutes. Remove squash from the oven and let cool.
Scoop the flesh into a saucepan (discarding the skin), and add the broth, rosemary, orange zest, a big pinch of kosher salt and pepper to taste. Bring to a boil, reduce heat, and let simmer for 30 minutes. Using an emersion blender, puree the mixture until smooth. Alternatively, transfer to a food processor or blender, and puree until smooth. Taste, adjust seasoning if necessary and adding the cream if desired. Serve with crusty bread.
Measuring ingredients with a weight scale, just as professional bakers do, will more accurately reproduce this recipe than will volume measurers. While more accurate than digital scales, mechanical scales are expensive, take up space and are perhaps unnecessary for the home baker. Salter brand makes several good, reasonably priced, easy-to-store scales available at Fante’s, Kitchen Kapers and Williams Sonoma. For normal baking, a six to nine pound capacity will suffice.
Challah
Adapted from Peter Reinhart’s The Bread Baker’s Apprentice (Ten Speed Press, 2001)
Yield = 1 large loaf
4 cups (18 oz.) unbleached bread flour
¼ cup (2 oz.) granulated sugar
1 teaspoon (.25 ounce) salt
1 1/3 teaspoons (.15 ounce) instant yeast
2 tablespoons (1 oz.) vegetable oil
2 large eggs, lightly beaten
2 egg yolks, (whites reserved) lightly beaten
¾ cup plus 2 T. water
sesame or poppy seeds for garnish (optional)
Whisk together the flour, sugar, salt and yeast in the bowl of a stand mixer. In a separate bowl, whisk together the oil, eggs, yolks and water. Pour the liquid mixture into the flour mixture. Mix on medium-low speed for six minutes using the dough hook, adding a touch more flour if necessary — dough should gather round the hook (not be stuck to the bottom of the bowl), but be careful not to add to much additional flour. (Alternatively, knead on a lightly floured work surface for 10 minutes. While this method works fine, using a mixer helps prevent adding too much additional flour to the dough.)
When dough is soft and supple (not sticky), transfer the dough to a lightly oiled bowl, rolling the dough to coat. Cover the bowl with plastic wrap and leave to rise for one hour.
Remove the dough from the bowl, knead for two minutes to degas. Shape the dough into a ball, return it to the bowl, cover with plastic wrap and let rise again for another hour, or until the dough has doubled in bulk.
Remove the dough from the bowl and divide into three equal pieces. (If using a scale, weigh each portion.) Roll each portion into a ball, place on a work surface, and let rest 10 minutes.
Roll the pieces into long strands, each the same length, each with tapered ends and a slightly thicker center portion. Braid the dough starting from the middle: On a work surface, place the three strands perpendicular to you and parallel to one another. From the left, number the strands 1, 2, 3. Beginning in the middle of the loaf and working toward you, follow this pattern: right outside strand over the middle strand (3 over 2); left outside strand over the middle (1 over 2). Repeat until you reach the bottom end of the dough. Pinch the end closed to seal and rotate the dough 180º so that the unbraided end is facing you. Continue braiding but now weave the outside strand under the middle strand until you reach the end of the loaf. Pinch together the ends to seal.
Line a sheet pan with parchment paper and transfer the loaf to the pan. Beat the reserved egg whites until foamy and brush the dough with them. (Set aside whites for later.) Mist the loaf lightly with spray oil and cover loosely with plastic wrap. Let the dough rest at room temperature until it is one-and-a-half times its original size, about 60 to 75 minutes.
Preheat the oven to 350ºF with the rack in the middle shelf. Brush again with the egg whites, and if desired, sprinkle with sesame seeds. Bake for 20 minutes. Rotate the pan 180º and continue baking for another 20 minutes, or longer. The bread should be a rich golden brown.
Transfer to a cooling rack and let cool at least one hour before slicing.
Tuesday, October 2, 2007
California Here We Come
Yay! So we just found out. Ben has been assigned to 1st Battalion, 4th Marines. We're moving some time around the New Year to Camp Pendleton, just north of San Diego.
While there are many things I will miss about Philly — pretzels, the Fair Food Farmstand, the Tuesday South and Passyunk Farmers' Market, Ding Ho and The Bulletin, to name a few — I am so excited to have the chance to live in California for the next three years. My sadness about leaving certainly hasn't settled in, but I cannot wait to finally see if all of my West Coast roommates' digs at East Coast Mexican food have been valid, and if it really doesn't rain in their perfect state.
Oh, and check out my latest entry about Claudio's fresh cheese on Uwishunu.
Subscribe to:
Posts (Atom)